Friday, September 28, 2012

Signs of the season


The Autumnal Equinox has passed us by, and everywhere there are signs that Autumn is making her grand entrance. Flowers producing seeds, scattered leaves, and the last of the summer blossoms fading away. 

Around here it signals time to pull out the sweaters, downy comforters, and hearty recipes. October begins next week and we will be pulling out all of our Halloween decorations, celebrating an anniversary, travelling to visit friends, and planning an 8th birthday party. 

What do have planned for October?


Wednesday, September 26, 2012

Artful Wednesday: Halloween decor!

Hooray! It's very nearly October! My favorite month of the year! I was married in October, my son was born in October, our married-couple-best-friends have their birthdays in October, and of course there's Halloween!
If October had any more awesome it would need to be two separate months.
But if Halloween isn't your thing, you can totally adapt this project to Christmas or family photos, or a tribute to Cher or Miss Piggy--whatever, roll with it. Make it your own.


I'm not sure what to call it...it's like a swag, a banner, and a flag. My mom suggested "flanner", so that's what we're going with. It took me about an hour--including picking my images, and stopping every step to take photos. I expect that it will take you about 30-40 minutes.

ASSEMBLE YOUR SUPPLIES!


An old cardboard box--sturdier than a cereal box!
Ribbon: The wide wired-type, and then two skinnier decorative types. 
Leaves: Fake or real
A ruler
A pen
A cutting tool and scissors
Glue stick
Tacky Glue
Halloween images--I have the Dover clip art books and I LOVE them, but there's a fair amount of free clip art around the internets

Step one: decide on your images. You'll want three. I chose two that were 4"x6" and one that was 4"x4". Cut out cardboard that measures the same as your images.

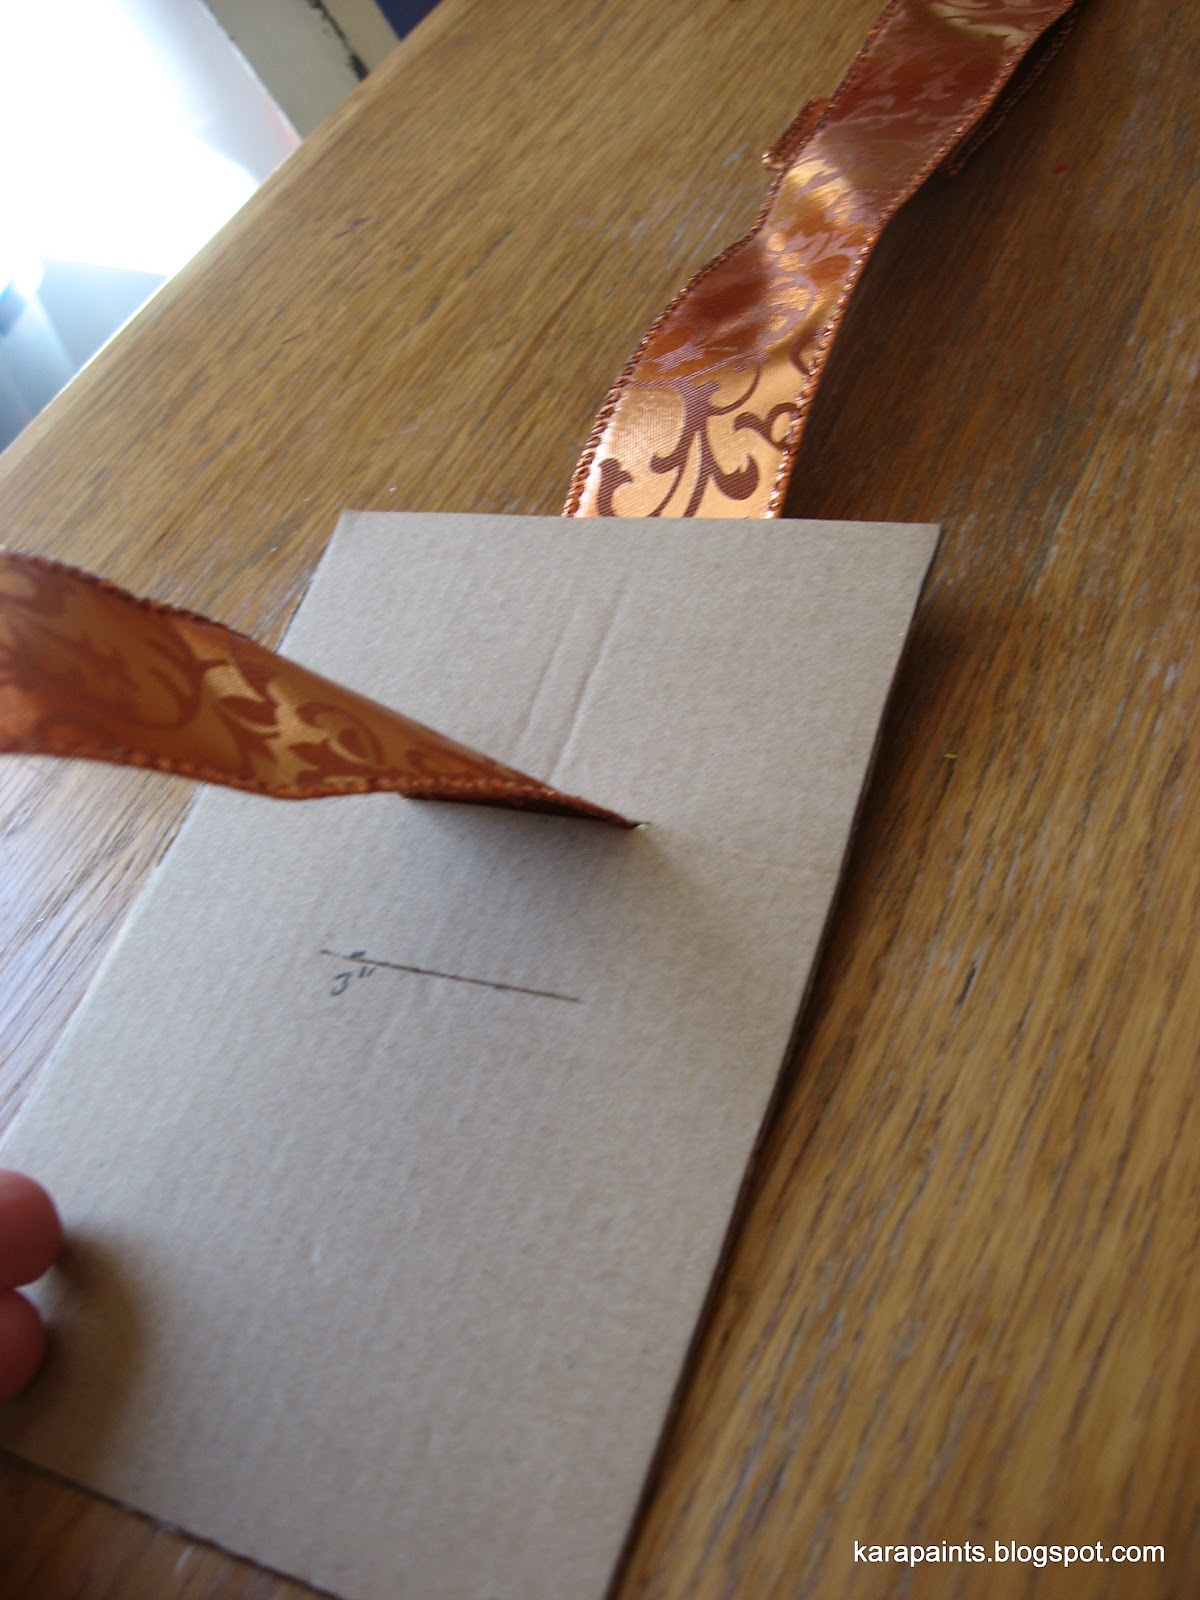
Step two: Cut two parallel slits in your cardboard. They should measure about the same size as your wired ribbon.


A close up of the slits. I measured from the top of the 4"x6". One slit was at 2" and the second was at 3". For the 4x4, the slits were at 1 1/2" and 3 1/2". If measuring is not your style, just eyeball it.


Step three: Cut 48" of wired ribbon. Thread your ribbon through the slits, like so:


Under, over, under. It's a pattern! Slide your cardboard pieces to about where you want them. Use a dab of tacky glue to keep your cardboard in place.


Step four: Cover the cardboard with glue from your glue stick. Be generous! (If you want to make these last for more than one season, swap out the glue stick for ModPodge)


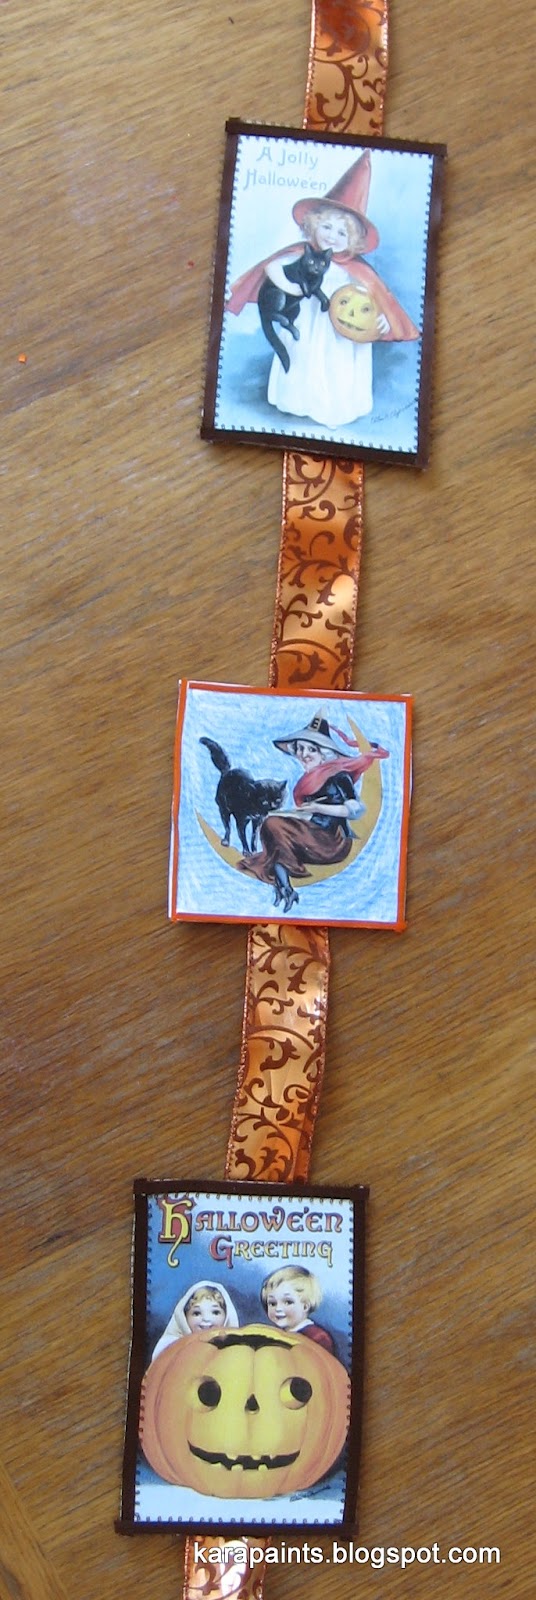
Step five: place your Halloween images onto the glued-up cardboards.


This is what we have so far. Cute, right?

Step six: cut your ribbon. In brown I cut four 6" lengths, four 4" lengths, and one 24" length. In orange I cut four 4" lengths, one 14" inch length, and one 18" length. Set aside the longest ribbon pieces.


Step seven: put a thin bead of tacky glue around your cardboards, one at a time. Match up your lengths. 


This is with the ribbon! Looking cuter by the minute!


Step eight: Get out three of your leaves.I used fake ones with wired stems for this part. Lay out your leaves in a fan shape.


One leaf,


two leaves,


three leaves.


Twist the stems and spread them out so they look like chicken feet...


Step nine: Lay the wired leaves on the bottom of your flanner, and bend the left and right stem behind the ribbon.


This is what it looks like from the front....


And the back.


Add a small line of tacky glue to the underside of the ribbon and fold over the bottom to attach.


Step ten: get your longer lengths of ribbon! Fold them in half, and tie around the leaf stems.


Like so! Notice that I'm holding down my glued portion with a clothes pin. They're invaluable for holding stuff together while glue dries.

Step eleven: Take that last leaf stem, fold it over, and tuck it around the back. If it's long enough, you can wrap it around a couple of times.


Step twelve: Up to the TOP of your flanner! Use your ruler and measure 5" from the top. 


Flip it over! Fold at five inches and glue that end down. Clothespin it while the glue dries, if you like.


Hang it up and admire your handiwork! I wouldn't put it outside, but it's so skinny you can hang it anywhere inside.


Monday, September 24, 2012

Accentuate the positive!


If you have good thoughts they will shine out of your face like sunbeams and you will always look lovely. --Roald Dahl

Despite my CRAZY MAKING schedule, we went to the zoo on Sunday. There were animals galore, as well as snacks and a whole lot of walking. It was nice to be outside in the sun, and in the act of just being in the moment. 

Despite the look on Fiona's face, the kangaroo statue picture was their idea. 
And now I'm off to duel with deadlines and humor the little Miss standing at my elbow. 

Saturday, September 22, 2012

Whosa whatsa?

Hidee!

I am writing to you in between making lunch, making chicken stock, hemming pants, making treats for our Mabon (Autumn Equinox) celebration tonight, and getting items ready to go for the crafts fair on September 29.
In short: I am crazy, I am busy...and I am short too!

 I have decided that I need to get back into my weekly to-do list-making so that I remember all the stuff that needs doing. FOR EXAMPLE: I was going to re-open my etsy shop today, but got so caught up in creating stuff for the craft fair I FORGOT to photograph my inventory. And as you know: on Etsy, nobody buys stuff without seeing it first. I also have to talk myself down from re-inventing the wheel. I have a perfectly serviceable to-do-list template. I don't NEED to make a new one.

Currently, I am the Queen of Distractions.
Ooh! A sparkly!

Ta, lovelies! My water is a-boiling and the minutes they are a-flying. Have a super keen Equinox weekend!

Wednesday, September 19, 2012

Crazy is as crazy does


I decided to sign up for a crafts fair at one of the local metaphysical shops a few weeks ago. The fair is September 29 & 30. I then came home and looked at what I already had in the studio...and decided that I needed lots more of everything. I also forgot that I was supposed to be re-opening my etsy shop on THIS SATURDAY, so hey! I have had my head in my own creative tornado for two weeks now. I am hoping that  once I get the shop open and get through the craft fair, I will calm down (haha!) and be able to focus on creating for the winter holidays. I have some pretty spiffy ideas that I'm looking forward to sharing with y'all. In the meantime, I'll be that lady at the grocery store covered in paint and clay and scraps of fabric. 

Monday, September 17, 2012

Monday already?!


"To live a creative life, we must lose our fear of being wrong." Joseph Chilton Pearce.

So many of the people I know claim that they can't make art because they strive for perfection right from the start. ART IS A PROCESS. It is distilling the world through your eyes, mind, heart, and soul and then presenting that distillation in your own voice.
It's a lot like life: You will make mistakes. You will look back on earlier works and cringe at their heavy-handedness, at your clumsy attempts. THAT'S OK. All children fall when learning to walk. All artists struggle before finding their own voice.

Every time I start a new project, something that I have never done before, I always view the first work as the learning work. It's the prototype. It's where I learn what works, how it works, and how I can make it better next time. It's OK to make mistakes. It's OK to fail.

Try something new this week. I am trying paper mache again for the first time in 10 years. I am hoping that it will do what I need it to. Only time will tell.


Friday, September 14, 2012

Photo Friday!


I don't know about where you live, but around here in Chicagoland it is FINALLY starting to feel like fall. I've had the windows open and have been scheming an apple-pie inspired weekend breakfast.

This week has been busy! My mom is in town (yay!), we went to Ikea (yay!). Fiona helped me make a large (four-foot) sign to hang in the front yard that reads "Don't Be Afraid To Let Your Talent Shine". There was glitter involved. It was out for two days, and then it rained. 

I've got my fall-inspired decor slowly making it's way through the house. My Dad is coming to town for the weekend (yay!), so I expect the weekend to be full of good stuff. I'm trying to make a point to use my camera a little bit every day, in the hopes that it will become second-nature and then I can really justify the purchase of a newer, faster, more-mega pixeley camera.

What's on the agenda for your weekend?

Wednesday, September 12, 2012

Artful Wednesday: When Good Crafts Go Bad!

Hey guys! Have you ever had a craft idea that you really wanted to share with your kids? Something that you thought was going to be THE CUTEST THING EVER? I had one of those ideas. I like to make Thankful Trees in the fall.(The idea is that you start with a tree trunk and then  write what you're thankful for on leaves and stick them onto the trunk) Last year we made one out of a paper grocery bag and used craft foam for leaves. It was a hit! It was also nearly as tall as me, and taped to the wall. We have since repainted, and I really don't want to worry about tape on walls. 

*Brainstorm*

FREE STANDING THANKFUL TREES! 
We'll trace the kids' hands, and OMG the cuteness will be off the charts. And since I am cheap frugal, I used  a cereal box for the cardboard. It helped that the box was already empty, but I have been known to move foodstuffs to alternate containers so I could use the original packaging. 

So! 
Supplies:
Cardboard
Pencil
Scissors
Cooperative children (ha ha ha)


Unfold your cereal box as best you can.


Have your whippersnapper trace his/her hands. Left first, and then right. Or visa versa. (It was at this point that the Fiona told me "no thanks! I don't want to do whatever that is")


Then have your whippersnapper cut out their cardboard hands. (Listen to them complain about the work involved in cutting until you break down and hand them kitchen shears, with the warning: don't cut your fingers off)


Cut a slit from the bottom to the middle of the palm in one hand, and a slit from the middle finger to 2 inches (or so) below the wrist.


Slide the two together at a 90-degree angle. Note the finger-removing kitchen shears!


Boy with tree! 
And then when I suggested that we make leaves to add to our tree, he responded with "Can I go play Legos instead?"
Fine. 


His tree looked lonely, so I made one too...
And every time a gust of wind comes through the screen door, they both topple over. So clearly they need some extra stability at the bottom. But my mom is coming to town, so I have just been picking them up every time I walk by.

Ultimately, the one I drew on our chalkboard was the winner....


Take a gander at the additional leaves and "decorations" added by Fiona. I guess that drawing on the wall seems way more fun than tracing and cutting.

Our thankful list includes: friends, family, cats, and video games.
What's on your Thankful Tree?

Monday, September 10, 2012

Let your talent SHINE!


Everybody has something that they are really really good at. Whether it's complex mathematics or baking the best apple pie. But it seems all too often we're afraid to mention it, because it seems like bragging. Here's a secret folks: if it's true (really, completely, honestly TRUE), then it's not bragging. 

I have a friend who makes THE MOST AMAZING cupcakes with crazy flavors I could never in a million years come up with (coffee with Bailey's butter cream frosting!!!!!!). I have dubbed her The Cupcake Queen (She's in my phone as Angela, Queen of Cupcakes); but she is really shy about telling people how awesome she is. 

I have another friend who is THE MOST AMAZING gardener, but all of her garden is hidden in her backyard so NO ONE ever knows that she has the greenest thumbs on the block. 

I offer you a challenge! Tell one person this week what you are really good at doing/making. Bonus points if it's someone who knows very little about you (co-workers, other carpool parents, the guy who serves you coffee). On Friday, I'll reveal HOW I told my neighborhood that I AM AN ARTIST. And ART is where I excel. 

Have a super week and don't be shy! You can tell ME what you're good at in the comments.


Friday, September 07, 2012

Friday!


A happy rainy Friday to you! 

We are playing with making mail art. When was the last time you mailed a letter?

This weekend will be full of art and learning to listen to what our spirits need. We'll be making need/want lists as a family, create individual Thankful trees, and spending time preparing for the turn of summer to fall.

Enjoy your first September weekend!

Wednesday, September 05, 2012

Owls!

Hello, lovelies! 
It's time for another Artful Wednesday. This time I wanted to share with you my newest fascination: OWLS! (I know, they've been around for a while, but I wasn't completely enamored of them until I saw the below photo on Pinterest)


I know, right?! They come from this blog, which is in Hungarian. And there are a great many words that Google translate has no idea how to process, but you can get the gist from reading the whole sentence. She got the owls from a web store which I cannot for the life of me find. So then I thought, "what if I make my own tiny owls?". 

But first I had to find some good pictures of owls. Guys, did you know that there is a World Owl Trust? It's true! It was from that site that I did a few sketches in my sketchbook.


This led to the owl pillow tutorial last week. And some other things which will eventually make their way here. 
Hope your week is shaping up nicely!


Monday, September 03, 2012

Quote of The Week


Believe you can and you're halfway there.

I have no idea who said this, so if you know drop me a line in the comments.

I think the other half is hard work, perseverance, and hard work. 

What do you think the other half is?