Happy Wednesday!
This is our last techniques session--we've got one more to tutorial to do with our wet-in-wet techniques but it has A LOT of photos, so I'll upload it as it's own post.
I hope you've enjoyed the tutorials and that they've helped you become more comfortable with watercolors.
Supplies! Go get some.
Towels: paper and terrycloth
Water: 2 containers
Sponges: unnecessary! (I keep all my supplies together in a box--the sponges just worked their way into the photo)
Brushes: A medium flat and a medium round
Paint
Permanent pen (I like the Faber-Castel Pitt Pen in Fine)
White Crayon (All I could find was a glitter crayon...)
Paper: sketch and watercolor (although, the watercolor paper is really for the next tutorial...)
Wax Resist
Use your white crayon to draw on your paper.
I wrote out a saying that I adore and a heart-shaped doodle.
On your text, use your flat brush and paint over the words with three different colors.
On your doodle, use your round brush and paint over the image with two different colors.
You'll find that the two brushes hold different amounts of paint (the round holds more) and gives your edges different qualities.
Next, draw a quote with your permanent pen, and fill one of the words with white crayon.
I painted inside the lines for "life is strange" and filled "wonderous" with white crayon and painted blue over top with a flat brush. Then I took a small round brush and added the flourishes.
Stamping
More supplies!
In addition to your paper, paint, brushes, paper towel and water.
Ink Pads (dye ink or solvent ink NOT pigment ink--it will turn into a blurry blur)
Assorted clear stamps and a block to adhere them (I like the clear stamps because you can see through them to ensure proper placement. Also, they ALWAYS have clear stamps in the dollar bins at Michael's, so you can stock up.) And yes, I do have some Martha Stewart stamps--but I bought them on sale (I worked retail and now I NEVER buy anything at full price--I know how mark-up works!)
Use your flat brush to lay down a square-ish of a lighter color: yellow, light green, sky blue.
Make sure your square is slightly larger than your stamp.
Next, remove the stamp from the packaging and affix the flat side to the clear block.
Use your flat brush to paint onto your stamp with a color that's darker than your square (orange, red, blue)
Cover it good! Then flip your stamp over and place it on the yellow square (which should still be a little damp). Smoosh it a little.
Pull it off and voila! You have a loosey-goosey, runny, interesting image.
Next, use your flat brush to lay down another square-ish larger than your stamp.
Then get out your ink pad. I'm using dye ink in rich cocoa (mmmm, chocolate).
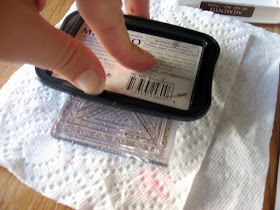
To get good coverage, flip the ink pad over and tap it onto the stamp. Tap, tap, tap until the whole stamp is covered.
Then place the stamp onto the damp square and smoosh it a little. Pull it off and hey! You have a cleaner image--one that shows a little more detail.
But is still a little runny around the edges. Oooh....
Now, obviously you can stamp over dry paint if that's your heart's desire. I just like the effects of wet-in-wet: fluid and unpredictable.
How to draw a cardinal
Why?
Because you'll need it for our next project. And yes, you could cheat and trace one, but they're actually quite easy AND they look great on holiday cards (I know it's August. I start early)
Supplies:
Pencil with an eraser
Paper
Practice
Step one: Draw a rectangle with a fat triangle cut out of the bottom
Step two: Draw a line up, and then a switchback
Step three: an open parentheses for a fat belly
Step four: a closed parentheses for shoulder/back
Step five: a long letter "J" for the back of the tail
Step six: a backwards long letter "J" for the front of the tail. NOTICE that the tail is NOT yet connected to the belly.
Step seven: connect the belly to the tail--tuck the belly line behind the tail. There's an overlap there!
Step eight: A wing! A line that mimics the shape of the mask, and then turns down and heads for the tail.
Step nine: The face. A circle where the point of the mask is. An arrow completes the beak.
Nine steps to a cardinal! Easy, peasy!
Next time we'll do a wet-in-wet tutorial and then we'll be all done.


No comments:
Post a Comment