Hooray! It's very nearly October! My favorite month of the year! I was married in October, my son was born in October, our married-couple-best-friends have their birthdays in October, and of course there's Halloween!
If October had any more awesome it would need to be two separate months.
But if Halloween isn't your thing, you can totally adapt this project to Christmas or family photos, or a tribute to Cher or Miss Piggy--whatever, roll with it. Make it your own.

I'm not sure what to call it...it's like a swag, a banner, and a flag. My mom suggested "flanner", so that's what we're going with. It took me about an hour--including picking my images, and stopping every step to take photos. I expect that it will take you about 30-40 minutes.
ASSEMBLE YOUR SUPPLIES!
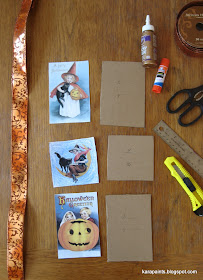
An old cardboard box--sturdier than a cereal box!
Ribbon: The wide wired-type, and then two skinnier decorative types.
Leaves: Fake or real
A ruler
A pen
A cutting tool and scissors
Glue stick
Tacky Glue
Halloween images--I have the Dover clip art books and I LOVE them, but there's a fair amount of free clip art around the internets
Step one: decide on your images. You'll want three. I chose two that were 4"x6" and one that was 4"x4". Cut out cardboard that measures the same as your images.
Step two: Cut two parallel slits in your cardboard. They should measure about the same size as your wired ribbon.
A close up of the slits. I measured from the top of the 4"x6". One slit was at 2" and the second was at 3". For the 4x4, the slits were at 1 1/2" and 3 1/2". If measuring is not your style, just eyeball it.
Step three: Cut 48" of wired ribbon. Thread your ribbon through the slits, like so:
Under, over, under. It's a pattern! Slide your cardboard pieces to about where you want them. Use a dab of tacky glue to keep your cardboard in place.
Step four: Cover the cardboard with glue from your glue stick. Be generous! (If you want to make these last for more than one season, swap out the glue stick for ModPodge)
Step five: place your Halloween images onto the glued-up cardboards.
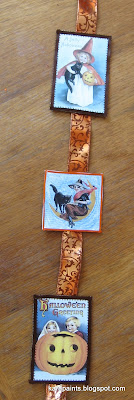
This is what we have so far. Cute, right?
Step six: cut your ribbon. In brown I cut four 6" lengths, four 4" lengths, and one 24" length. In orange I cut four 4" lengths, one 14" inch length, and one 18" length. Set aside the longest ribbon pieces.
Step seven: put a thin bead of tacky glue around your cardboards, one at a time. Match up your lengths.
This is with the ribbon! Looking cuter by the minute!
Step eight: Get out three of your leaves.I used fake ones with wired stems for this part. Lay out your leaves in a fan shape.
One leaf,
two leaves,
three leaves.
Twist the stems and spread them out so they look like chicken feet...
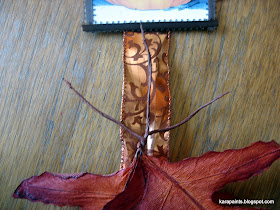
Step nine: Lay the wired leaves on the bottom of your flanner, and bend the left and right stem behind the ribbon.
This is what it looks like from the front....
And the back.
Add a small line of tacky glue to the underside of the ribbon and fold over the bottom to attach.
Step ten: get your longer lengths of ribbon! Fold them in half, and tie around the leaf stems.
Like so! Notice that I'm holding down my glued portion with a clothes pin. They're invaluable for holding stuff together while glue dries.
Step eleven: Take that last leaf stem, fold it over, and tuck it around the back. If it's long enough, you can wrap it around a couple of times.
Step twelve: Up to the TOP of your flanner! Use your ruler and measure 5" from the top.
Flip it over! Fold at five inches and glue that end down. Clothespin it while the glue dries, if you like.
Hang it up and admire your handiwork! I wouldn't put it outside, but it's so skinny you can hang it anywhere inside.


No comments:
Post a Comment