Saturday, June 30, 2012

Independence Day Bunting Tutorial


Because nothing says "Happy Birthday, America!" like tri-color bunting. 
I've kept the pattern generic enough that you can use it for Memorial Day, Veteran's Day, Bastille Day and your 17th May celebrations. I'm sure that there are other countries who use a Red-White-Blue color scheme as well, so feel free to get festive in a global manner.

Let's get Crafty.
Gather your supplies!


Two sheets of 11"x14" paper
Ruler--I like an 18" ruler, myself. (Insert bad George III pun here)
Pencil
Scissors
Watercolor brushes--one large, one small
Kitchen string--usually for trussing roast birds, but I find it to be an invaluable addition to the art cupboard.
Watercolor paint


 Step one: Measure!
On the long edge of your paper, mark at 3.5", 7", and 10.5".
Do this on the top & bottom edge


Step two: Connect the dots!
La la la, connect the dots!
From the top left corner to the bottom 3.5" mark.
From the top 3.5" mark to the bottom 7" mark.
From the top 7" mark to the bottom 10.5" mark
From the top 10.5" mark to the bottom right corner.

It's diagonal, baby!


Step three: Reverse!
Connect the dots:
From the top right corner to the bottom 10.5" mark
From the top 10.5" mark to the bottom 7" mark
And so on and so forth. When you're done, it should be a lovely diamond pattern, like the above picture.


Step four: Draw a line that bisects your diamonds & turns them into triangles. This should be about 5.5" up the page.

Next: BRING OUT YOUR PAINT!


Step five: On one sheet, free-hand horizontal lines in red with your big brush. On the second sheet, free hand vertical lines. 
No, seriously. Free-hand them. You're making a bunting that is unique to you, not machine made! Also, the squiggles aren't obvious once you cut out your triangles.
Let your red paint dry.


Step six: On your horizontal-line sheet, free hand a blue line with your small brush in the white space.On your vertical-line sheet, use your small brush to make polka-dots down the page in the white spaces. Let your paint dry completely.

Step seven: Cut out your triangles--follow the lines you drew before the painting happened.


Step eight: Stack your triangles 4 deep, and pop holes in the top with your hole punch. Make sure your holes are at least 1/3" from the edge to prevent tearing while you string them up.


Step nine: Thread those bad boys up. I went with a simple A-B pattern, but if you're working with kids have them pattern it however they want. Below is an overhead shot of the threading technique.
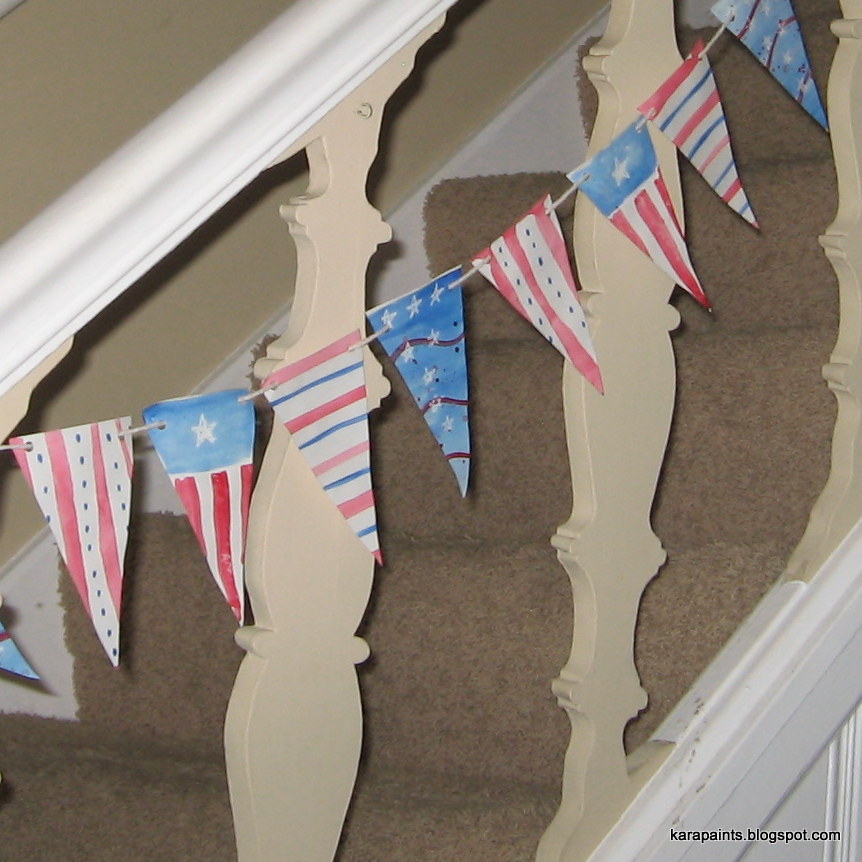

Taa-daah!
 I cut 7.5 feet of string, and it I had 5 flags left over. You could cut 9 feet and use them all.


Tie a loop at the end of the string. This way you can hang it on a nail, or hang it using tape. Also, it keeps your flags on the string while you carry it around the house.


And if you have a few triangles left over, you can pull out some skewers and make flags!


Now even your potted plants can feel the festive air! (Or you could stick them in a cake, a flower arrangement, a toy boat, or your hair)


Happy Independence Day, y'all!


Wednesday, June 27, 2012

Watercolor Workshop: Techniques!

Welcome welcome!

When I think about watercolor techniques, I like to divide them into two categories, so that's what we'll do here. 
Get out your supplies: paper, paint, brushes, paper towels,white crayon, and two containers of water. One to rinse, and one to dip in for fresh water--this way you can avoid your lighter colors turning to mud in your palette.


Ready? OK! Here is where I explain the two category idea.
 Category one: Wet on Dry. This means: wet paint on dry paper. Wet paint on dry paint. This can help you build up layers of color, or combine techniques to create a really nifty effect (this is how you get bricks that look like bricks and stone that looks like stone).
Category two: Wet on Wet. This means: wet paint on wet paper. Wet paint on wet paint. If you look at the image below, you can see the difference most clearly in the 2 bottom examples--the graded wash.
If you want your colors to blend softly, use the wet-in wet. 


 This week and next week we'll be doing Wet on Dry.
You'll need to gather up some household supplies for these week lessons.


Kosher salt
Table Salt
Paper towel
Terry cloth towel
Spray bottle
Painter's Tape
Synthetic sponge
Natural (sea) sponge

I like to make a note at the top of my page, so that when I look back later I can remember what I was working on.


To start, pick a color, any color. I chose blue and purple because of the high-contrast value--it would be easier to see what I'm talking about here.
Grid up your paper again. You'll need sixteen squares when we're all done.

SQUARE ONE: Kosher Salt
Lay down a wash of color*. Sprinkle Kosher Salt in the wet paint. When the paint is COMPLETELY DRY, brush off the salt crystals. This leaves you a nifty snowflake like effect.

* "a wash of color" is when you load your brush up with wet paint, and fill in a space with the paint.

SQUARE TWO: Table Salt.
Lay down a wash of color. Sprinkle Table Salt in the wet paint.When the paint is COMPLETELY DRY, brush off the salt crystals. This leaves you a smaller snowflake like effect.

SQUARE THREE: Natural Sponge, Dry
Lay down a wash of color. Blot up some of the color with the sponge.

SQUARE FOUR: Synthetic Sponge, Dry
Lay down a wash of color. Blot up some of the color with the sponge.

SQUARE FIVE: Natural Sponge, Wet.
Lay down a wash of color. Blot up some of the color with the sponge.

SQUARE SIX: Synthetic Sponge, Wet.
Lay down a wash of color. Blot up some of the color with the sponge.

SQUARE SEVEN: Natural Sponge, Dry.
Get your paint good and wet. Dip the sponge IN THE PAINT and apply to the paper.

SQUARE EIGHT: Synthetic Sponge, Dry.
Get your paint good and wet. Dip the sponge IN THE PAINT and apply to the paper.

SQUARE NINE: Natural Sponge, Wet.
Get your sponge wet, and squeeze out all of the excess water. Get your paint good and wet. Dip the sponge IN THE PAINT and apply to the paper.

SQUARE TEN: Synthetic Sponge, Wet.
Get your sponge wet, and squeeze out all of the excess water. Get your paint good and wet. Dip the sponge IN THE PAINT and apply to the paper


Using the blotting technique.

Using the sponge instead of a paintbrush.

SQUARE ELEVEN: Blot with Paper towel.
Lay down a wash of color. Blot up some of the color with the paper towel. Some of the texture from the towel should leave an imprint in the paint. You can try folding the towel and seeing what kind of results you get from different edges.


SQUARE TWELVE: Blot with a terry cloth towel
Lay down a wash of color. Blot up some of the color with the towel. This will give you a softer, more diffuse look.

SQUARE THIRTEEN: Splatter!
Load your brush with color, pull bristles back with your thumb and slowly release.


SQUARE FOURTEEN: Splatter over a wash.
Lay down a wash of color. Let it dry completely, then splatter paint over the top.


SQUARE FIFTEEN: Wax resist
Draw on your paper with a white crayon. Lay down a wash of color.

SQUARE SIXTEEN: Wax resist over a wash.
Lay down a wash of color. Let dry completely. Draw with a white crayon. Lay down a wash of a second color.


There you go! Five techniques: Salt, Blot, Sponge paint, Splatter, and Wax Resist. 
Mix and match three and see what you like best. 

Next time we'll add a few more techniques, and then I'll talk you through using these to create an image.


Sunday, June 17, 2012

Watercolor workshop: Color!

Welcome back!
I LOVE COLOR. It is short of a miracle that I don't live in a house with each room done up like a paint-chip display at the hardware store. Don't you just love those? All of those colors arranged so harmoniously with each other!
Here's the thing about color: once you understand it, your whole life gets easier--and more colorful!

Colors are divided into groups:

Primary colors are your foundation. 
Red, Yellow, and Blue.
You can't MIX these--you have to buy them. 
If you have your primary colors plus Black and White, you can mix any other color.

Secondary colors are what you get when you mix your primaries.
Red + Yellow = Orange. 
Red + Blue = Violet. 
Blue + Yellow = Green. 
 If you have your primaries and your secondary colors you have a rainbow.

Tertiary colors are what happens when you mix a primary and a secondary. 
They are: red violet, blue violet, 
blue green, yellow green, 
yellow orange, red orange. 
Yes, the primary's name goes first--they're that important! 


You may remember the color wheel from your grade school days:


Complementary colors are opposites on the color wheel: Red and Green. Orange and Blue. Yellow and Violet. 
If you mix them together, you'll get a brown that is pretty close to black. 
But if you put them next to each other, it makes them pop! And will make your art (or your wardrobe) more vibrant.

Analogous colors are neighbors on the color wheel: 
Red-Orange-Yellow. 
Yellow-Blue-Green. 
Green-Blue-Violet. 
These colors will always look good together.

This week, you should make a color mixing chart! 
It will give you the full range of possibility that you have with your palette, plus get you used to working with your brushes.


Since I am working with a sixteen-color palette, I made my squares a half-inch. If you aren't as into rulers and measuring as I am,  go more free-form. 

The way this works is: 
Make a nine inch square. 
Measure off a 1 inch column* on the left and a 1 inch row on the top. 
Then measure off half-inch increments for columns and rows. Connect your measurement lines**, and voila! You have a grid. 

* Columns go up & down. Rows go left & right.
** I mark of measurements on the top & bottom of the page--and connect those. Then I mark off measurements on the left and right of the page and connect those.

For each column, write each of your colors at the top (in that one-inch space that we so cleverly left open)--until you run out.
For each row, write each of your colors on the left (in the one-inch space)--until you run out.

You should have a red on the top AND a red on the side, an orange on the top AND an orange on the side, etc.

Paint the color in each square that has that name. 
I did columns first. 
Above, you'll see a column of each color in the 16 color palette.
LET THE PAINT DRY.

Then paint across the rows with the corresponding color. 
You will paint OVER the squares you painted.

When you're done, it should look like this: 


Kind of fun, right? (Or not. Again, I LOVE color, so I get a kick out of having my own personalized paint chips)
Now you have a reference sheet for your palette! Oh, the possibilities!
You can pick any 4 color neighbors and they will always look good together.

Be aware of the colors that you are drawn to. Look in your wardrobe and see what colors you have the most of. Look around your space and see what colors you have chosen to bring into where you are. Jot down in your sketchbook/journal when you see color combinations that you really like.

Next week: techniques and tips!


Tuesday, June 12, 2012

Watercolor Workshop!


Starting today I am offering a FREE watercolor workshop. It will run 6 weeks and feature a new technique each week. 

Welcome! I am glad you have decided to join me. I really enjoy watercolors. My love started in 1995 when my Grandma bought me a Windsor & Newton travel set. I had never before seen watercolors look like they did--saturated and mixable. I took classes in watercolor at a local art center on my summers home from college. Now watercolors are my go-to when I am doing a quick rendering, they travel well, and they can be quite versatile. I hope that after you've completed the workshop you will find yourself reaching for your watercolors more often.

Now onto supplies!


Brushes! 
We'll do what I consider the very basic--what I pack when I'm travelling.
You'll need two round ones--a big and a small.I use a #4 and a #8. They are sized by number, the higher the number, the bigger the brush. If your watercolor set came with one that has actual hair-like bristles you can use that for your small. If it has those black plastic bristles, throw it out. 
You'll also need two flat ones--a medium and a large. I use a 1/2" and a 3/4". The flat ones are sized by their measurements.
Please don't be intimidated by the your choices in the brush aisle at your art store. You don't need top-of-the-line, but don't buy the super cheap brushes, either. (They shed their bristles like mad, and you'll spend a great deal of time picking stray bristles out of your work) Buy "student quality" brushes--they are economically priced and made of synthetic materials. I personally like the Windsor & Newton brushes.

Pencil & Eraser
For quick sketching before painting. 

Pen
With indelible ink.
You can buy a Pitt pen, and Micron, or a fine Sharpie pen.

Crayon
In white, for the resist technique.(We'll get to that)


Paint!
Spend the money and get paint (semi-moist watercolors) by Prang. A set of eight costs around $7 and a set of 16 costs around $13. Crayola is nice, but you won't get the full-saturation. If you already own watercolor paint in tubes, great! Go ahead and use those. Every basic set should contain: Red, Orange, Yellow, Blue, Black and White. If you're going to be mixing your own purples make sure your red is Alizarin Crimson. 


Paper!
We're going to take a minute to talk about paper. Because I can hear you now: Paper is paper, right? 
No. Not really.
Do you remember in grade school when you would paint with watercolors and your paper would tear and get these little paper-lint balls all over? 
Yeah. That was the worst. It put me off of watercolors for a long time.
That's because the paper you were using wasn't the right weight.
Paper is categorized by weight in many instances. Take a look on the front label of your paper--usually the weight is listed near the number of pages. The higher the weight, the more liquid a paper can absorb before it begins to curl or disintegrate. For watercolors, I recommend 120lbs or higher, but you can squeak by with 100lbs if you're careful.
Watercolor paper is ALSO divided into three surface categories: rough, cold press, and hot press. Hot press is the smoothest of the three. I suggest you get a watercolor paper sampler and see which finish you like the best.
If you want to know more about paper, visit here.

As we do other projects, we may need other supplies--but it will be things that you have around the house (or can scrounge from your neighborhood diner).

See you next week for our first project!