

Find me now at KaraPaints dot com!
Showing posts with label artful wednesday. Show all posts
Showing posts with label artful wednesday. Show all posts
Wednesday, July 17, 2013
More art journal
I was overwhelmed by the textures and patterns in the Dominican. Too many for the eye to capture!
Wednesday, May 29, 2013

Wednesday, March 27, 2013
Wednesday sketchbook
I learned how to make polymer clay butterfly wing canes!
Now I have a surplus of butterfly wings. I am exploring some ideas to put them to use.

Now I have a surplus of butterfly wings. I am exploring some ideas to put them to use.
Wednesday, February 20, 2013
Well hidee!
I have been crazy busy! I went out of town over the weekend to do a little tattooing and a little visiting. We got home last night at 8 pm, when I looked at the calendar and realized that I have a commissioned painting due Friday.
Now I'm grabbing my supplies and loading up the car; I teach private art lessons on Wednesdays. Today we are working in charcoal and doing a still life.

Now I'm grabbing my supplies and loading up the car; I teach private art lessons on Wednesdays. Today we are working in charcoal and doing a still life.
Thursday, December 13, 2012
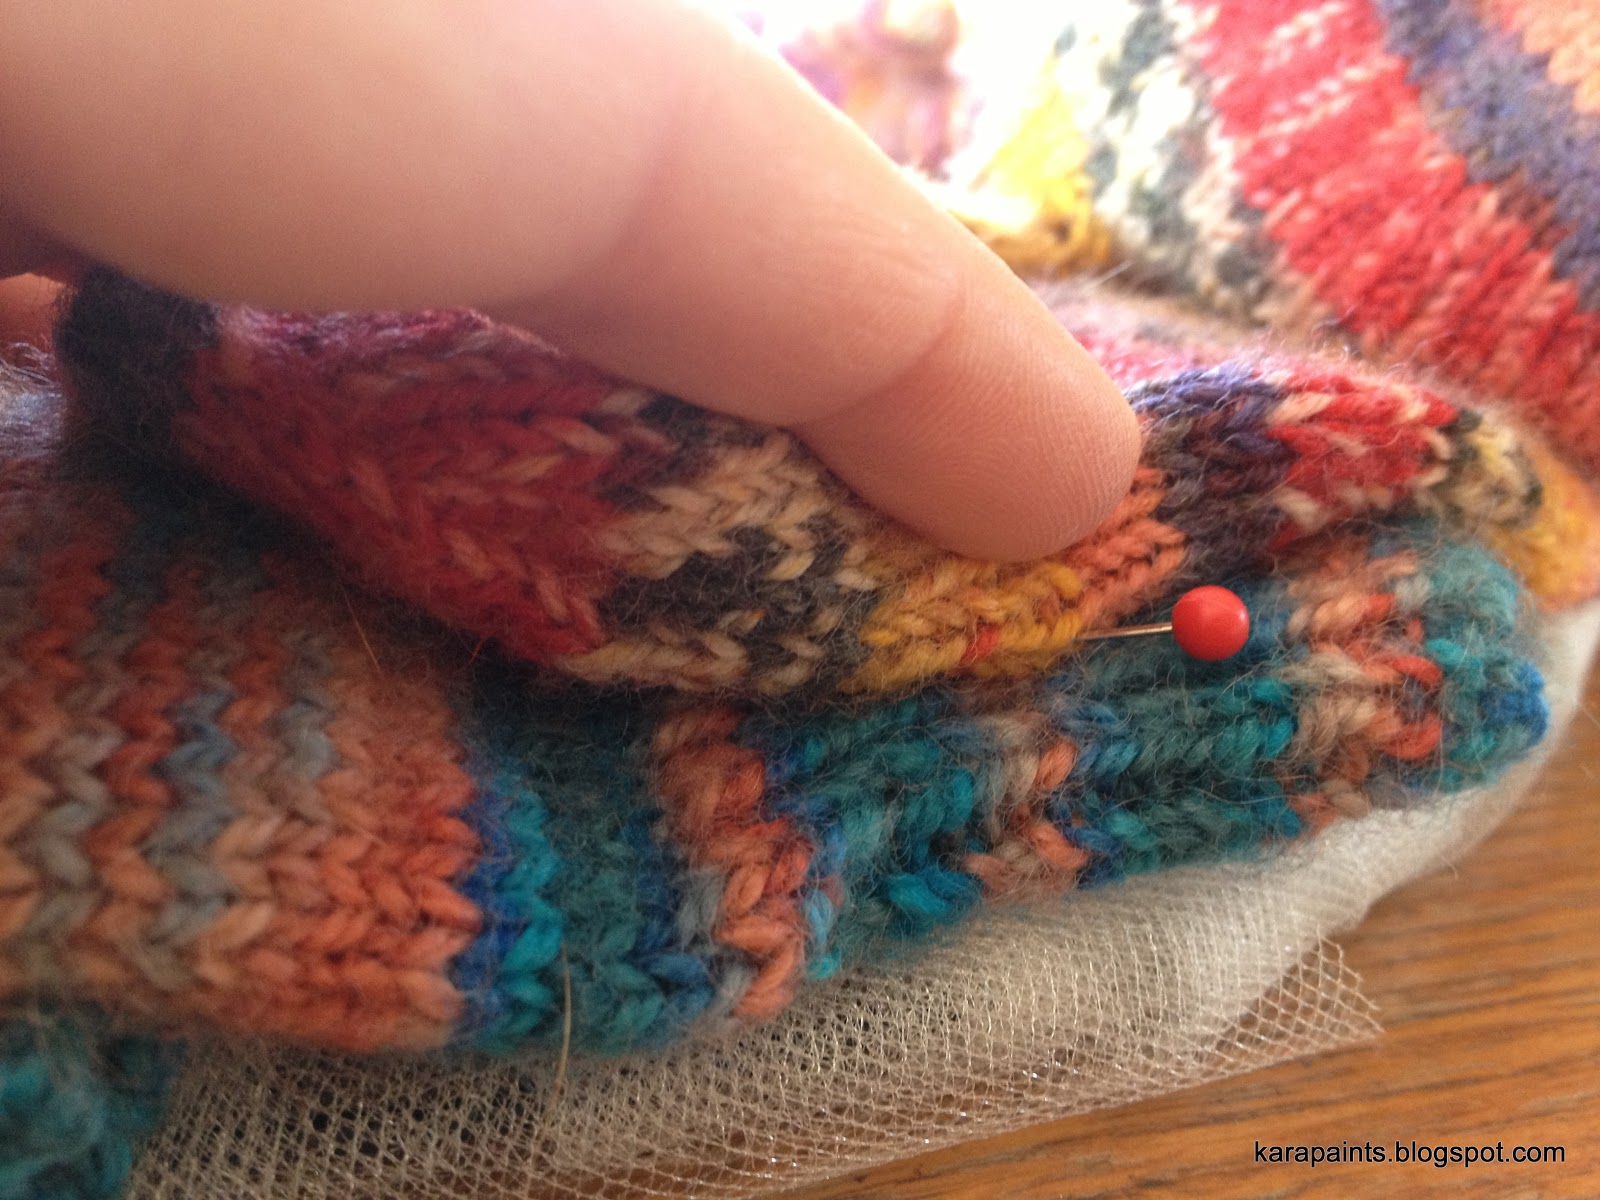
Mitten Wreath
Hey y'all! Yesterday I was laying on the couch, cursing all germs. Today I am vastly improved.
How about we make a cute wreath that we leave up until spring comes?

I think this wreath is a good use for them until the day when there are other small hands to wear them.

Supplies:
Wreath form You can use a Styrofoam wreath form or a wire one. If you use a wire one, you'll need to wrap it with some kind of fabric so you can pin the mittens on (I've used tulle)
Mittens (6 pair)
Straight pins

Tie your fabric around the wreath form and then wind the fabric around the form until it's covered at least twice over.

Tuck your loose ends under, and then tie whatever material you are using to hang your wreath over the loose ends.

Lay your mittens down and pin through the cuff into the wreath. You'll be overlapping the mittens so the pins won't show.

Pins? What pins? I see no pins here...

Once you've pinned all your mittens on, pick up your wreath like you're going to hang it. You'll notice some of your mittens at the top are floppy. Pin those into place, hiding your pins underneath the edge of the mitten.

You are so sneaky!
Hang your wreath up and pat yourself on the back.

P.S.--Thanks for the idea, Mom!
Wednesday, December 05, 2012
Glitter Candlesticks
Welcome, welcome!
It's another Artful Wednesday, and I am slowly ticking my way through the list of gifties I am crafting. This would be a perfect hostess gift with a box of candles, all tied up with a pretty bow.
Glittered candlesticks! Easy peasy and oh-so-pretty!
Supplies:
Two wooden candlesticks (Bayer Wood again. I love those guys!)
White acrylic paint
ModPodge (hard coat, please)
Wide Flat paintbrush
Glitter (I used extra-fine glitter in Emerald)
Bowl (to catch your glitter)

Step one: Paint your candlesticks white. I did two coats of paint. Let that dry. (The white paint was completely inspired by some pillar candle holders I saw at Target)

Step two: One at a time, paint the bottom half of your candlesticks with ModPodge. DO NOT let dry.

Step three: Hold your candlestick over the glitter-catch bowl and shake glitter all over the wet ModPodge. Let Dry. I recommend a second coat of ModPodge and glitter. Let that dry.

Step four: Paint a coat of ModPodge over your dry glitter. This will keep your candlesticks from raining glitter over everything.

I love how they sparkle!
I'm going to leave you to your glitter collection and put some candles in my candlesticks.
Happy Wednesday!
Wednesday, November 28, 2012
Upcycled Casablanca Gilded Jars

Does it snow in Casablanca? I have no idea. If you know, please enlighten me. These jars were inspired by a whole bunch of things: Moroccan lanterns, painting on glass, and Peaches' gilded jam jars.
There are a few important lessons that I learned doing this project.
First: SIMPLE DESIGNS ARE YOUR FRIEND. Keeping it simple really is the key to success here. Gold leaf is super thin and will adhere to things via the magic of static. Which is why the front lantern looks great and the back looks (to quote my five year old) like a haunted house.
Second: Mixing food color and ModPodge doesn't give you super-awesome-vibrant colors. I'm going to have to actually spring for actual glass paint if I want jewel tones (so much for being thrifty)
Third: Gold leaf sealer is stinky. Open a window.
Got all that? Ready to make some gorgeous candle holders?

Supplies
A clean, empty jar
Paint brushes (a big flat one, and a soft one)
A bowl for mixing glass paint
ModPodge
Food coloring
Rinse-water jar (I add a drop of dish soap to keep the ModPodge from settling in the brush)
Gold leaf, gold leaf adhesive, gold leaf sealer (Got mine at Michael's)

Step one: Mix up your glass paint. I went with green because I like green and gold together. I used Lucy's recipe of 1tsp ModPodge, 1.5 tsp water, 3 drops of food coloring.

Step two: Paint the inside of your jar.

Step three: Set aside to dry. I did mine upside down because I didn't want a big pile of glue & food color at the bottom of my jar. How great is that green? I loved it. Sadly, it was not to stay.

Step Four: While you wait for your paint to dry, Google Image Search Moroccan Lanterns, and come up with some pattern ideas (Or just use mine). On the haunted house lantern, I was going for a design like the large one on the bottom of the right page.

Step five: Paint your patterns on the outside of the jar with gold leaf adhesive. REMEMBER: Simple works best! Let the adhesive dry according to the directions on the bottle.

Step six: Get out a sheet of gold leaf. (I like the stuff that's already stuck on a paper backing. It's easier to handle)

Step seven: Apply the gold leaf to your jar. Rub the paper side to make sure the gold is sticking.

Tip: Use your soft brush to smooth out air bubbles and flatten out fly-away pieces of gold.

Step Eight: Seal your gold leaf according to the directions on the bottle.

This is what they will look like without a light inside. More sea-glass-meets-Casablanca, but still pretty.
Have fun with it. Gold leaf is great stuff. It is an easy way to add bling to just about anything, it's inexpensive, and it makes candle light look a million times better.
Wednesday, November 14, 2012
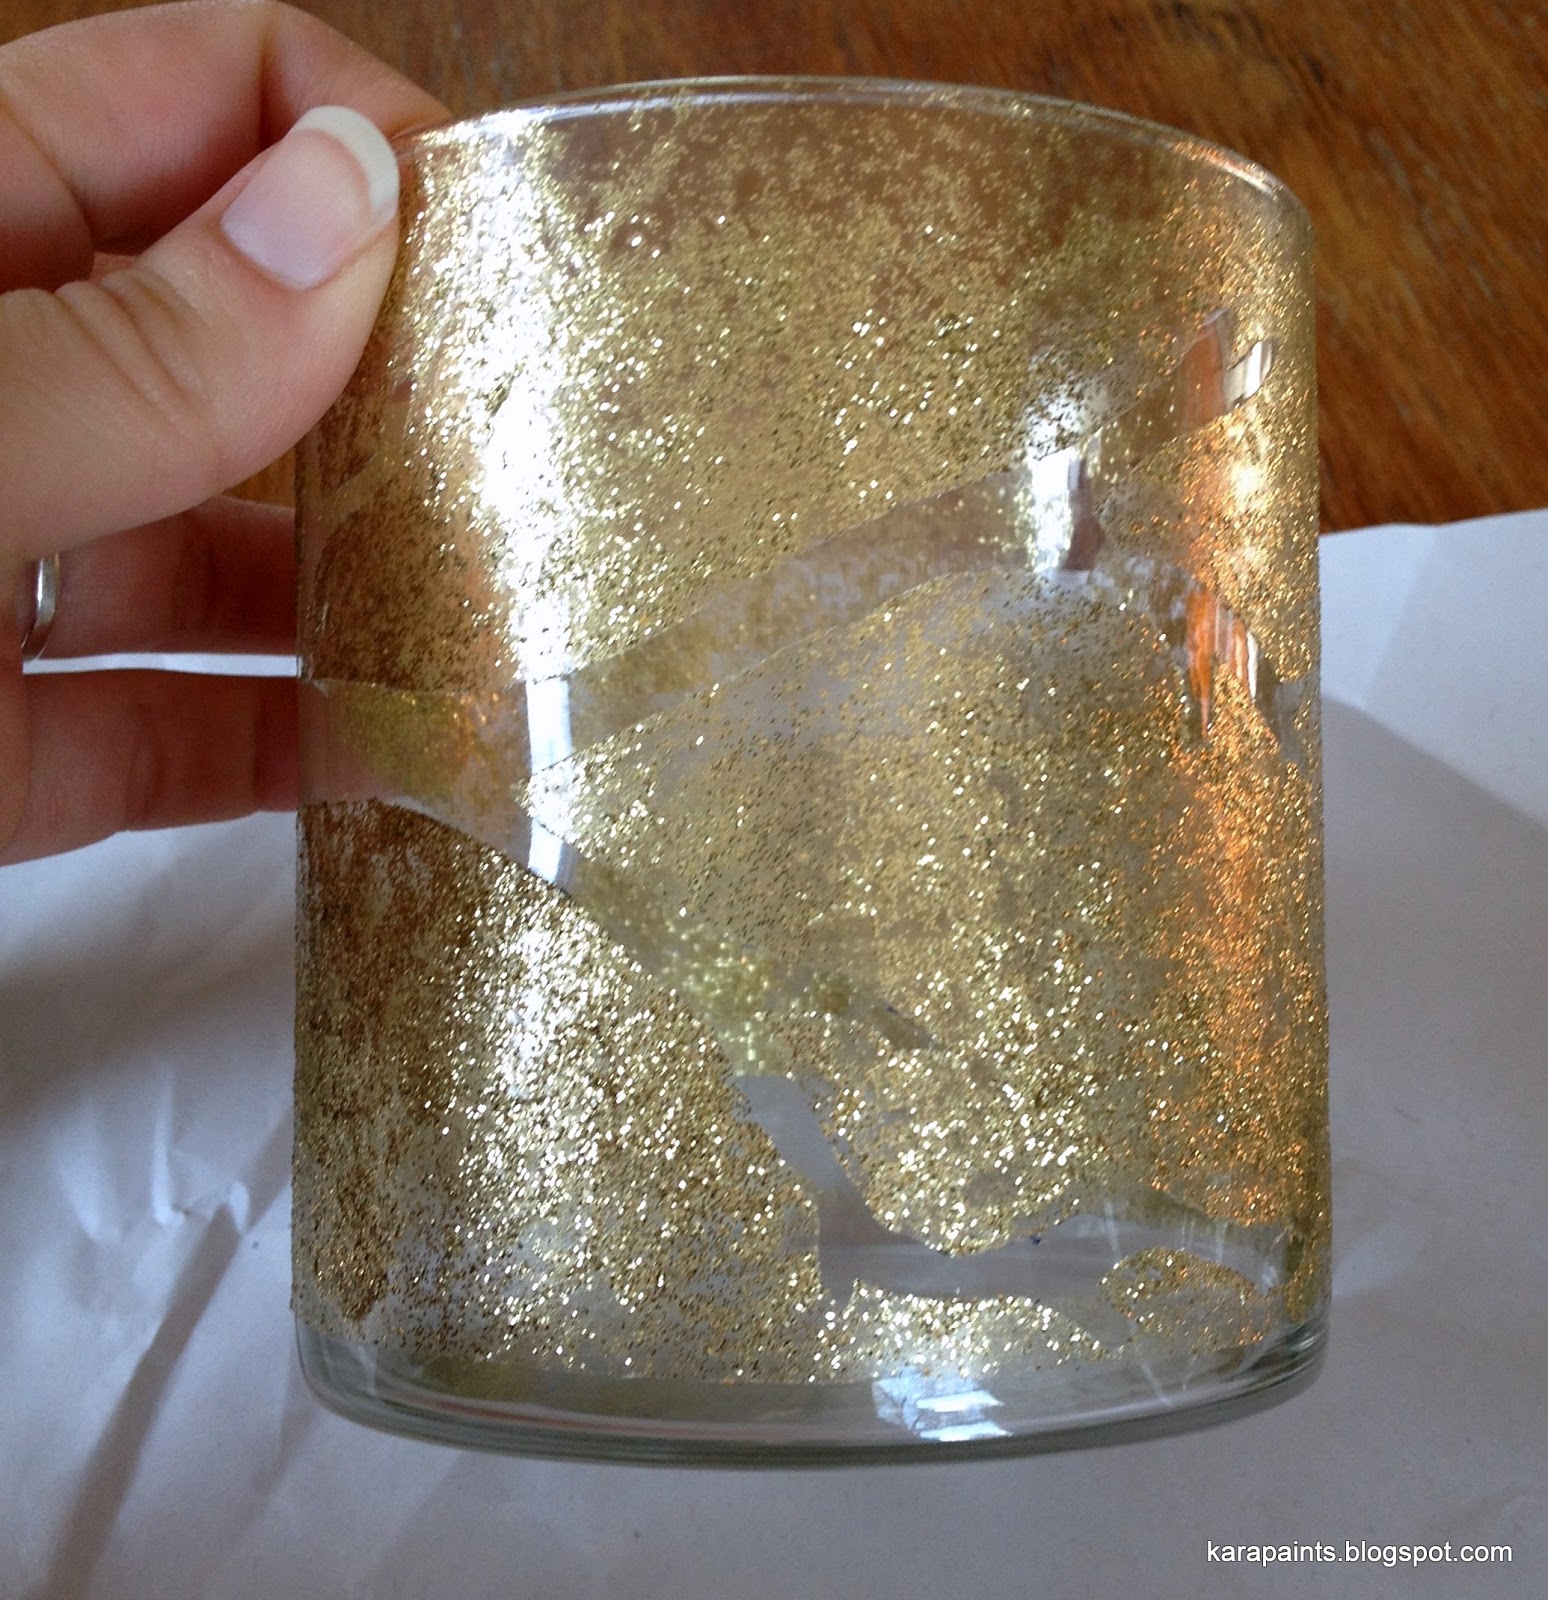
Branch Out Glitter Jar Tutorial

Say it with me now: oooooh, sparkly! As the season of gifting is approaching with rapid speed, it's good to have a few gifts you can pull out of your pocket. This jar is a multi-tasking gift-givers dream. You can fill it with food, candles, gift cards, or put flowers in it. The whole project costs about $10, and all of the supplies are readily available at craft stores. I got my stuff at Michael's.

Supplies:
Lidded glass canister
Painters tape 2" wide
Scissors
Permanent marker
Sponge brush
Martha Stewart Crafts Multi-Surface Glitter Acrylic Craft Paint (I'm using Florentine Gold and Peridot)
Step one: clean any residue off your container with alcohol. I didn't have rubbing alcohol, so I used vodka. Works great!

Step two: sketch out a branch on your painters tape. (Stuck already? Google Image search "branch silhouette" Pick one you like. Print it out, cut it out, trace it onto your tape) Cut your branch shape out with scissors and smooth onto the outside of your glass.

You with me so far?
Great!
Tape around the bottom edge, about 1/2 an inch up from the bottom. This gives it a nice finished look when you're done AND prevents the glass from sticking to your work surface while it dries.
Step three: Squeeze the paint directly onto the glass. Dab it around with your sponge brush. I am holding the glass on the inside and rotating as I go.

Step four: Wipe the paint off of the tape with a damp paper towel. Let it dry. I waited about 6 hours, and then did another coat of gold.

Step five: Peel off the tape. I neglected to wipe the paint off of the tape, so I had to cut around the tape with an exacto blade before I peeled it off.
It's pretty awesome like that, but I am a big fan of CONTRAST, so let's add some more paint.
Step six: Apply your second color of paint directly onto your branch outline. Dab into place with your sponge brush. If you color outside the lines, just wipe it off with a finger. The wet paint comes right off of the dry surface.

Step seven: let it dry and then fill it with whatever your heart desires. I'm going to fill mine with homemade gingerbread granola.

This post was inspired by Aunt Peaches and her glitter plates!
Thursday, November 08, 2012
No-sew table runner tutorial

Fall is slowly sliding into winter, and with this change comes a boat-load of holidays that encourage us to gather our loved ones around a table piled high with food and be grateful. I usually set the table runner up on the table with the booze and glasses because the table is tiny and the people are many, but for illustrative purposes we're using the dining room table.
This table runner is super fun, super easy, and can be done in about 15 minutes. Also, you can include the kids in this one. They love leaf-hunting and crayon-rubbing.

Supplies:
An Iron & Ironing board
Neutral-colored cloth, preferably cotton.
Leaves: 3-5 of different sizes or from different trees
Crayons
Step one: figure out how long you want your table runner to be, and cut that size out of your fabric.
I usually lay the fabric on the table, and then fold the cloth until it's a size that I like. Generally, you'll want it to be 1/3 the width of your table. Length-wise you can have it go to the ends of the table, hang over the edge of the table, or have it stop about 12 inches from the edge. I like mine short because then you can seat people at the ends of the table and then I don't have to worry about kids pulling it, and everything else, off of the table (I learned that one the hard way).
Step two: flip your fabric upside down, and fold each side in a 1/2 inch. Press with an iron. If you want to keep your runner forever and ever, I would buy some fusible seam tape and iron your seams together that way.

Step three: Get out your crayons. Confession: I keep a bag of busted crayons for rubbing projects. The colors are up to you. You can match your dishes, use autumnal tones, or go mod with black and grey.

Step four: Place a leaf, vein-side up, under your fabric

Step five: turn your crayon on it's side and rub on top of the leaf. Use the fingers of your opposite hand to hold the fabric down flat while you rub.

Step six: Place leaves under the fabric, one at a time. For the best results, overlap them, turn them in different directions, and alternate colors.

Step seven: place your finished runner on your table with your upcycled tin can luminaries and some flowers or a bowl of fruit.

To attach ribbon to the luminaries, use scotch tape.

That's it!
You can wash your table runner in COLD water, and then hang it up to dry.
Your opinions, please:
The photos from this post were taken with my IPhone. I think I'll need to edit the next batch first, yeah?
Wednesday, October 24, 2012
Skull Madness: Sugar Skull tutorial

Hola hola, mis amigos! I love skulls--and as I tell my kids: they aren't scary, they're necessary or we'd all have heads like jellyfish. I also love bright colors and patterns, so naturally sugar skulls appeal to me on a fundamental level. Like when you were six and would geek out over My Little Ponies or GI Joe.
I have thus far come up with two variations on polymer clay sugar skulls, but give me time and I'm sure I'll make more. ARE YOU READY TO GET CRAFTY?
Supplies, for Sugar Skulls two ways:
Polymer Clay--I used Sculpey Brand Premo clay--white and one other color of your choice.
A cutting tool
A needle tool (or a needle and a pencil)
Jump rings (10mm size)
Pin backs
Acrylic Paint (black,plus 3 colors of your choice)
Paint brush--small round (like a 2 or 3)
Fine tipped permanent pen in black
Rubber stamp with floral pattern
Oval clay cutter (like a cookie cutter but smaller)

First you'll need just your clay, cutting tool, needle tool, and oval cutter.
Put the oval cutter aside, because we're going to get handsy and make dimensional skulls first.
Take 1/4 of your clay block (it's pre-scored, so just cut along that indentation) and soften it up. You can work it with your hands until it's squishy, or if you have a clay roller you can use that. Once your clay is good and soft, roll it into a ball.

Then kind of pinch one end to make an egg-shape. Lay that down and cut it in half lengthwise.

Now you have two skulls! One to wear, one to share.
Flip them over and roll the cut edge towards the back.

Once your edges are rolled, flip it back over and kind of smoosh it with your thumb to flatten the front a bit.

Smoosh!
Below I have drawn a rough sketch of facial dimensions. The eye sockets will be about 1/3 from the top of the skull, and the mouth about 1/3 from the bottom. Don't get crazy with measuring though, you can just eyeball (ha!) where you want your eyeballs.

Use the back end of your needle tool to press 2 indentations where the eye sockets would go.
Use the needle part of your tool to make a mouth.

And again, use your needle tool to make teeth lines. 4-6 lines work best--we're not going for anatomical authenticity here.

Now look at your skull--how cute! If you like you can smooth out any rough edges around the eyeballs.

Get out your jump rings--the 10 mm ones.

Take one and smoosh it down into the top of the skull.

Use your needle tool to close the hole made by the bottom of the ring. This will make sure that you don't lose your head later.


Admire your handiwork. Set him aside to wait his turn in the oven. Go ahead and make your second skull. I'll wait....
Okay?
Now, Sugar Skull method number 2! (or Numero 2, if you prefer)
Take about half the amount of clay that you used last time, and roll it out to about the width of a nickle.

Get out your oval cutter and cut an oval. Use the cutter, slightly staggered to cut away the bottom portions of the oval. I've found that having a chin segment that's thumb-width is about right. Also, I had to do this at least 5 times before I figured out where to cut. It's OK if it takes a few tries.

Use your needle tool like you did before to make eye sockets and teeth.

Roll out your second color of clay to the same width.

Play around with placement of your skull. I eventually settled on a tombstone-like shape.

I used my cutting blade to cut that out. DON'T SQUISH YOUR SKULL ON THERE YET!

Pull the skull off and place it to the side. Get out your floral stamps and randomly stamp on your dark clay.
Now flip over your stamped clay and get out your pin back.

Place the pin back on the clay, opened.

Use scraps of leftover clay to hold it in place.
Make sure you can open and close the pin!

Now flip it back over and put your skull back on the front. Awww.

Bake your skulls in a 275 degree oven for 40 minutes.
Let them cool after baking.
Have a snack.
Get out your paints, paint brush, permanent pen, paper towel.

First things first, paint all your eye sockets black. Also, paint the teeth lines black.

NOSES! They are just tiny upside-down heart shapes. The easiest way to draw them is to flip the skulls upside down and draw the hearts right side up.Paint inside of the noses black, too.

Take your permanent pen and DRAW*. It's traditional to do floral shapes around the eyes. But you do what you feel moved to do.

Next, use your pen to connect all of your vertical lines and make teeth. The tops of teeth are rounded, not square, so use your lower-case-m writing skills here.

Same thing for the bottom teeth. Cursive-lowercase-w writing skills. (Do they even teach cursive anymore?)
Repeat for all your skulls, regardless of size.

Get out your paints and paint away. Paint your flower petals, paint lines around your teeths. Paint hearts and stars and spiderwebs. Paint all the Lucky Charms shapes on there!

Do some scroll work swirly stuff. Paint lines or dots around the edges.

With these two techniques, you can go skull crazy. And I heartily recommend that you do!

* I have found that permanent pen takes a while to dry. If it smears, take a damp paper towel and wipe it off. Also, it's probably a good idea to seal your paint with a matte sealer after it's completely dry--like 24 hours later.
Subscribe to:
Posts (Atom)