Saturday, July 28, 2012

Watercolor Workshop: wet in wet techniques


Welcome! I hope you're ready to get back into working with watercolors--I know I have missed it! 
This time we'll be exploring 6 techniques and talking about working with the wet in wet method.


Working wet in wet can yield some really beautiful results, but it's also a little unpredictable. It's best to go into it knowing that you can guide your color, but you can't tame it. If you are super OCD this is probably not the technique for you. Here are some tips to help you manage this crazy colorful technique:

1. Paint won't flow where the page is dry. If you want to create shapes or work around shapes, you can lay down a wash of plain water on your page to direct the flow of the paint.

2. Watercolors can be "erased". Not with an eraser, but with plain water and a paper towel. Lay down your water and DAB up the puddle. Don't rub--rubbing will move around the fibers on your paper and leave a weird-looking spot.

3. Use watercolor paper. Sketch paper, drawing paper,and Bristol board are not designed to hold the weight/moisture of the water. Watercolor paper is somewhat like painting on a sponge. You'll be a lot happier with your end result when you use the right paper--it won't curl, rumple, or disintegrate (unless you use WAY too much water)

4. Play first. It's a good idea to play around with techniques and color combinations before you attempt a masterpiece.For play, it's okay to use heavier-weight sketch paper (80 lb and up)

5. Let it dry between layers. This way you'll experience minimal color mixing, and you won't wind up with a muddy painting of muddy colors.

6. Mistakes happen. It's okay to start over, it's okay to walk away. I've been painting with watercolors for 17 years--and I have started over and walked away many MANY times.


Ready to get started? 
Assemble your supplies!


Paint
Paintbrushes (a 3/4" flat and an 8 round--or thereabouts)
Paper
Water x2 (one for fresh and one to rise out your brush)
Sponges (one natural and one synthetic)
Salt
Paper towel
Terrycloth towel


Since we're going to be working with wet-in-wet, you need to dampen your paints. The easiest way to do this is to dip your round brush into the clean water and then drop the excess into the paint well. Wait until you see the bead of water hanging off the edge of the brush, and then just place the water drop on the paint. You don't need to put the brush into your color--gravity will pull the water off the brush.


A brief word about brushes: flat brushes hold less water (and therefore less color) than round brushes.
Round brushes are commonly called "mops" in the watercolor vernacular, because of the water they hold and the way you use them to push the paint around.

Now on to techniques!

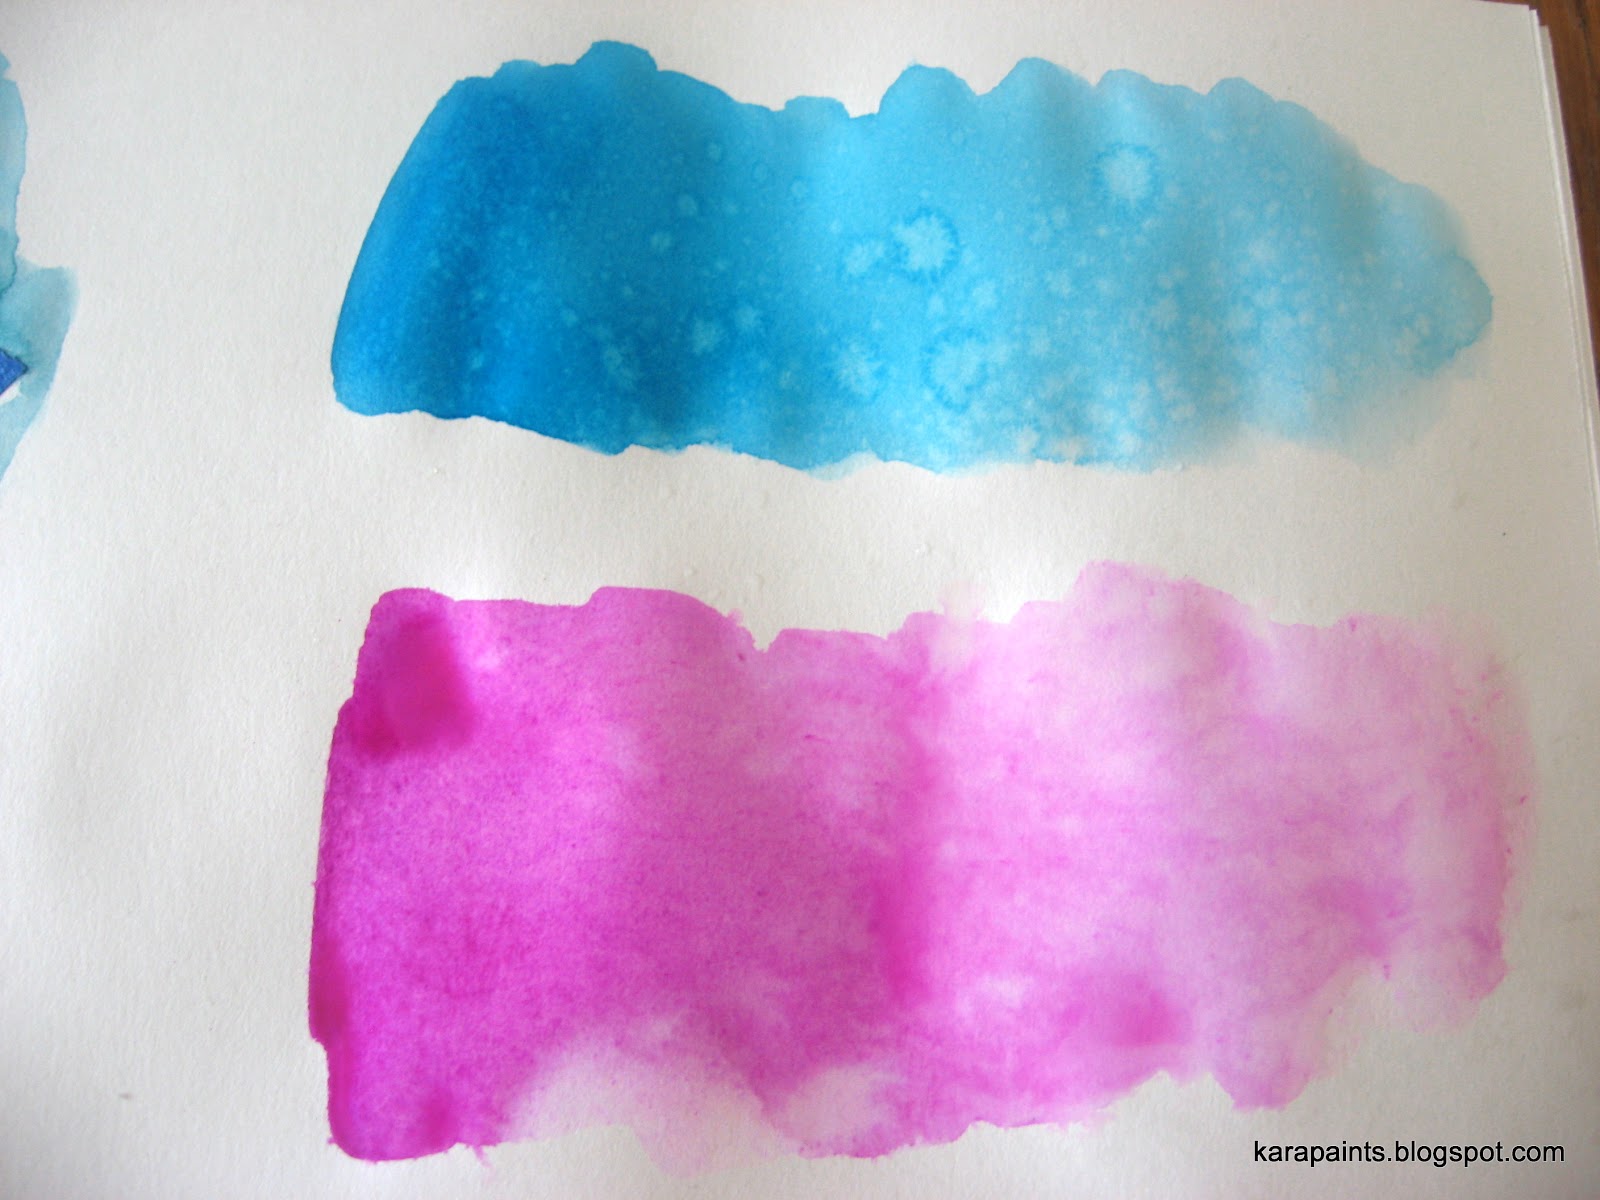
Mixing two colors on a wet page
Lay down clean water with your flat brush.
With your round brush, paint over the left side with purple. 
While this is still wet, lay down teal on the right side.
When everything is still wet, you can push the paint around a little bit.

Things are going to puddle and run together a bit.


As it dries, the paint will spread out to cover the wet surface and create hard edges of color.


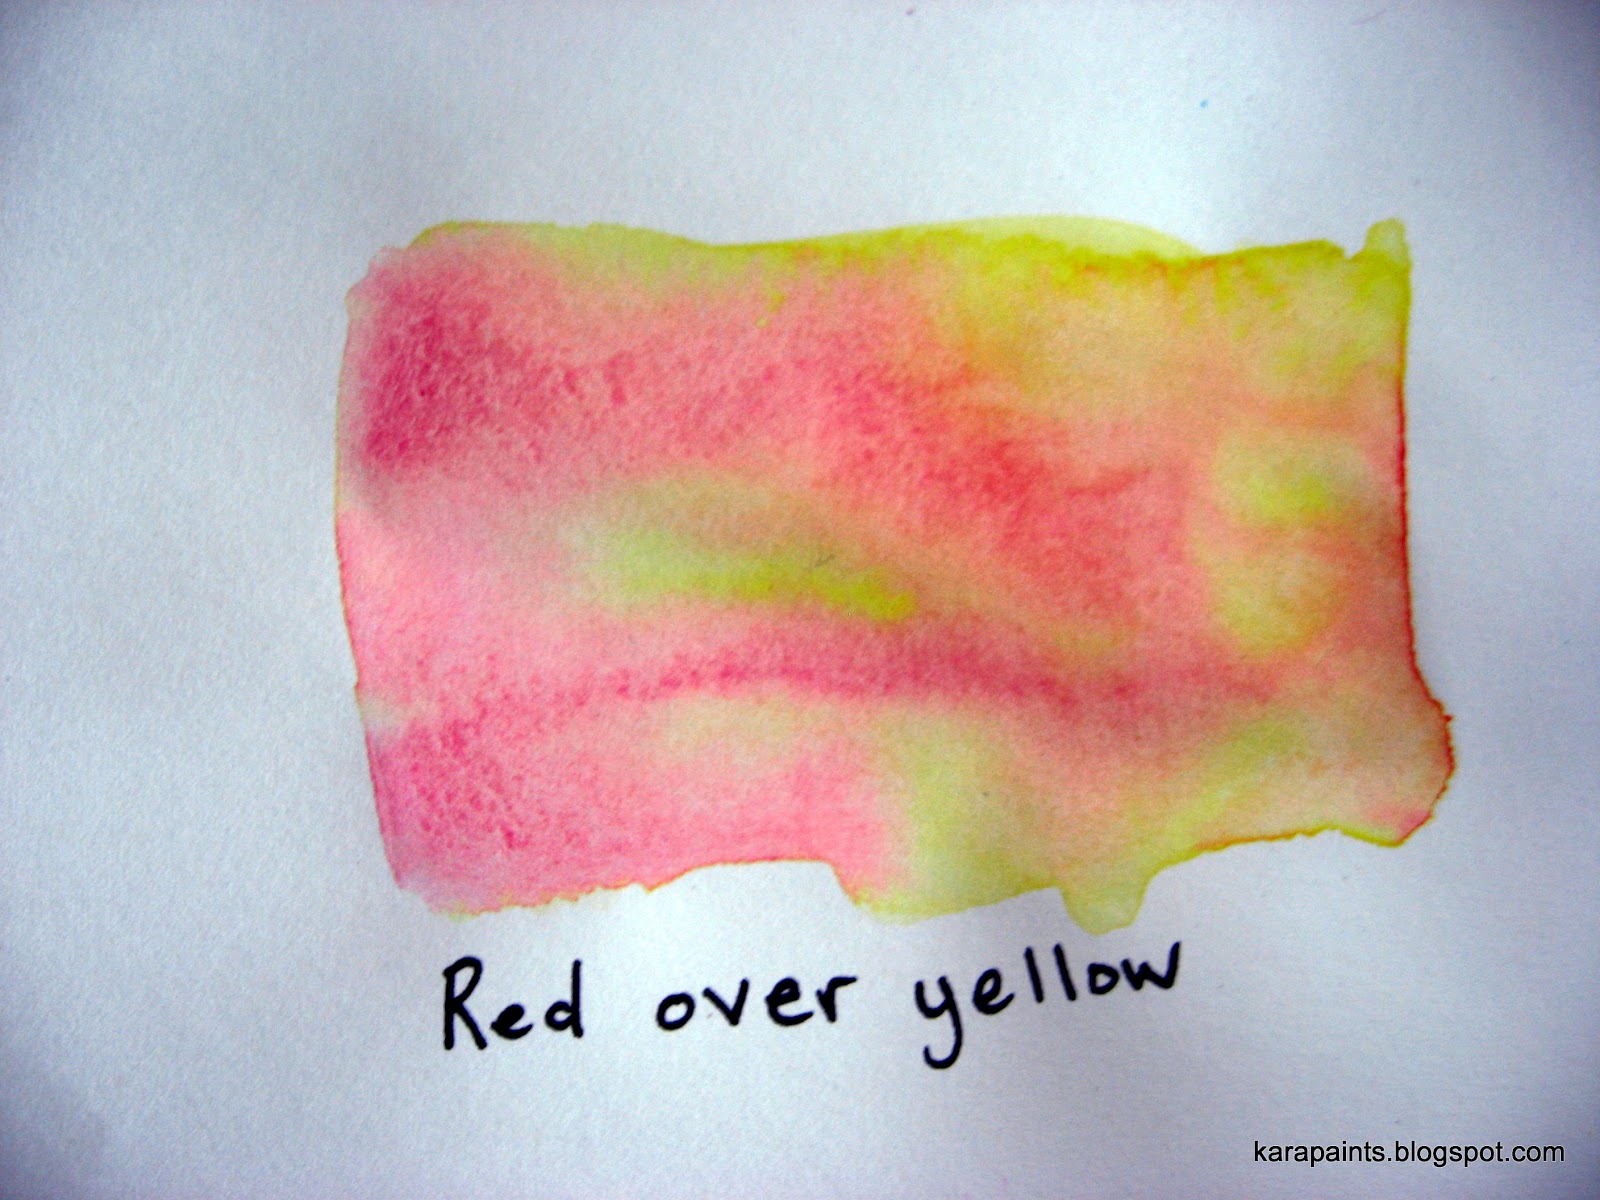
Color over color on a dry page
Lay down a wash of yellow with your flat brush, and lay down a wash of red over the still-wet yellow. Don't mix them together--let the water act as your mix. It yields interesting results--the end results remind me of salt deposits on flood plains.


Add salt
 Lay down a wash of teal and a wash of dark green. To get it soupy-looking, use your round brush.
Sprinkle with kosher salt and let dry. Once completely dry, brush off the salt. 
The results will vary based on how wet your paint is, how much salt you use, and the humidity levels.


Splatter
Lay down a wash of yellow (flat or round brush). Splatter magenta into the wet paint using your round brush--really load it up with paint. And if you need to flick it more than once, go for it.


Blotting
This can be done with a variety of absorbent materials: paper towels, sponges, terry cloth towels, old t-shirts or socks, tissues, newspaper.
Here, I've laid down a wash of lime green on dry paper with dark green over it. Then I blotted with a natural sponge.
I recommend you try it with paper towels also--often the pattern in the towel gets left in the top layer of paint.

This leaves a really subtle end result--just the faintest hint of texture. I used my round brush for this one.


Painting with sponges
Lay down a wash of orange with your flat brush on dry paper, then get your sponge wet. (dip it in the clean water and squeeze out the excess) Dab the damp sponge into the magenta paint and apply to the wet orange.


I love the way part of the orange was lifted off by the damp sponge, and the feathery texture as the two colors bled into one another.

That's it for this week. Try all these techniques on dry paper and on wet paper. You'll be surprised at the variety you can achieve, and you'll be sure to find a favorite. 

Next week we'll do a few more wet in wet techniques and get started on a painting. 


Friday, July 27, 2012

Patience, I have very little.


I don't do waiting very well...
Currently, I am waiting on paint to dry so I can photograph it, upload & edit, and do the next installment of the watercolor workshop.

This week I had house guests, so I was in "bare minimum" accomplishment mode. I managed to cook dinner and breakfast and get the kids to swim lessons, and that was about it.

Which means that today I'll be doing laundry, making phone calls, finishing art works, and figuring out my schedule for the next 6 weeks.

I start teaching art lessons the second week of August at The Garden Gallery and Studio. If you live nearish, sign up! It will be fun fun fun!

I'm going to go haunt Pinterest, make some lunch, and then check on that paint. It's sure to be dry by then, right?

Edited to add:
Our prayer flags for M's wedding made it up on the Prayer Flag Project blog! Thanks to Jane for the inspiration and the shout out!

Saturday, July 14, 2012

Road Trip Kits Tutorial

On Monday the kids and I are going to be taking a mini road trip. ("Mini" is anything under 300 miles) Last September all four of us took a 1900 mile round-trip road trip, and we survived! The benefit of being that long in the car is my children now feel that anything under 3 hours is a "short drive". I also learned a few things about packing busy kits. As next week's drive is a mere 260 miles, I made mini kits.Our kits ALWAYS include games, things to color, snacks, drinks, music, and small toys.

 I don't know how much searching you've done on making things for road trip busyness, but everything I saw was aimed at KIDS WHO CAN READ. I only have one of those, so I had to make kits that LOOK the same, but address different skill levels and different interests.

BEHOLD:


These are pretty easy and once you have the supplies on hand you can re-use them. Also, you can ditch the plastic bucket and stick the whole thing in a back pack for air travel. I learned from the epic road trip that reuseable grocery bags and individual zip-top bags aren't going to work with my seven year old--he would dump everything into the bag at once and get grumpy when he couldn't find things. So I came up with plan B.


The green side is for my reader, the pink side is for my pre-reader. The middle is things they both have.
For each kit you will need:
A plastic bin with handles--I picked oval ones so they will both fit in between the seats simultaneously.
A 3 ring binder
Dry erase markers
Plastic sheet protectors
A pencil pouch
Coloring pages ( I used Coloring Pages for Kids--it's free and they have a wide variety to chose from)
Games 
Assorted crayons (Not pictured. I dug through our crayon bin and pulled out a rainbow for each kid)
A small piece of cloth or an old sock (to wipe away the marker Also not pictured.)

Let's take a minute to talk about GAMES.
For my reader, I printed up word searches and mazes from Printables 4 Kids. Again, free and a large variety. I also made a photocopy of our travel route map, so he can see where we are and how far we have to go.
For my pre-reader and reader alike
BINGO--you can search online for bingo games or you can make your own. I used Microsoft Word (and the create table function) and clip art to make a Bingo game of things that we would see on our drive. (Pictured in the middle of the bottom row)
The ALPHABET game (Again with Microsoft word) Make a bingo grid and fill each square with a letter of the alphabet. The instructions are: find all the letters of the alphabet using signs and license plates.
The COLOR game (Again with Microsoft word) Make a bingo grid and print it out blank. Hand the kids some crayons and have them color each square a different color--there will be repeats, it's OK. Then have them check off each color as they see something with the color outside of the window. 
GUESS WHO--a total cheat. We got this at the drive-thru window at a McDonald's one time and I have been saving them.
POST IT NOTES--have them draw houses or boats or planes or cars or goats. Stick them on the window and watch the scenery roll by behind it. This is particularly funny when you draw Godzilla and drive through an urban area.You can also use post its to make fake moustaches, third eyeballs, and really big ears.

Slide all of your printables and games into plastic sheet protectors, then check the items off with DRY ERASE MARKERS. That makes your games re-useable, which is super handy because most road trips are two ways.
Clip your papers in their protectors into your 3 ring binder, along with the pencil pouches.

In the pencil pouch put the dry erase markers, crayons, and post its.

(So far, I have spent $4.50 per kit. Thanks, Dollar Store!)

What about SNACKS?! 
It's not really a road trip without snacks. 
I don't know how many of you are on Pinterest, but have you seen the snack bin with the eleventy-billion compartments? It's made from a jewelry storage container from Hobby Lobby (or similar) and has a ton of divided up spaces filled with goodies. At first glance, my thought was YES. Then I sat down and really thought about it and came up with 2 problems to that storage solution: 
1. If that gets dumped out in the car that's a whole lotta mess to clean up.
2. I am way to lazy to scrub out eleventy-billion compartments full of food crumbs.

So, the lazy mom answer is:


Two storage bins WITHOUT interior dividers (these were on clearance at Hobby Lobby for $4.19, you could just as easily use a pencil case). Mini-loaf liners ($2.99). Treat bags ($1.99). 


The benefit here is that you can put ACTUAL fruit in the bins, and not just dried fruit. Sliced apples in a treat bag or dried apples? I know which my kids prefer. It also allows you to throw in granola bars and other pre-wrapped treats.

A banana, cracker-cheese-dip thing, granola bar, penguin crackers, mini pretzels. (Yeah, it's kind of carb-heavy, but I was photographing this at 10:30 last night and didn't really have the energy to slice an apple, or decoratively arrange carrot sticks and mini tomatoes.) 

You could even pack it like a picnic lunch with sandwiches and raisins. The point is: if it's individually wrapped and it spills it's NO BIG DEAL. And if you can divide up the space as you see fit, your possibilities are endless--and you don't wind up with kids who have eaten all of their chocolate chips, m&m's, peanut butter chips and are now bouncing around the backseat like Chihuahuas on speed.

So they have had their snacks, and they've played their games and they're BOOOOORED. 
Enter tiny toys!


Every time I clean their rooms, I swipe the neglected toys at the bottom of the toy bins and bag them up--about six toys per quart-sized ziploc. This way they have tiny toys on the go! Perfect for waiting at restaurants or in the doctor's office or on road trips.

Lastly, I include reusable water bottles and their MP3 players & headphones. We're a music-loving family with wide-ranging tastes. Having their own makes the arguing over music minimal.

So wish me luck. This is the first 5 hour trip with just the kids and myself. I am hoping the above kits will forestall some of the whining. 


Monday, July 09, 2012

Watercolor tutorial, wet-on-dry

Hello! 
As promised, we're going to take all of those wet-on-dry techniques and make ourselves a picture. It's a summer-cabins-in-the-woods-at-night kind of picture.
Get your supplies assembled!

Watercolor Paper (5"x7")--I used 300lb cold press
Paint--I'm using Prang paints
2 brushes--round #9, round #4
2 containers of water--one to rinse, one to dip
Painter's tape
Scissors
Sponges--natural & synthetic
Spray bottle
Terry cloth towel
Paper towel
Kosher salt
Permanent fine-tipped pen


Step one: Tape your paper down to the table. This will give you a nice border when we're done, and holds the paper in place later--we're going to get a little rough.

Step two: Cut 3 rectangles and 3 triangles out of your tape. Assemble them to make houses and affix to your paper


Step three: Lay down a wash of Green 39 (blue-green) for your grass. Let dry.


Step four: lay down a wash of Blue 35 (Cerulean) for your sky. Let dry.


Step five: Lay down a wash of blue over your first wash of blue 35, and a wash of green over your first wash of green 39. Let those dry.


Step six: Get out your natural sponge and dip it in your water--squeeze out the water so the sponge is damp. Spray water onto your green 39 paint. Dip the sponge in the wet paint. Dab along where the sky and ground meet. Paint over the houses! This way the sponge-trees make a more natural tree line. Let dry.


Step seven: Natural sponge again! Use your spray bottle to dampen the green paint; dip your DRY natural sponge in it. Go over the dark green. Let dry. Rinse out your sponge and set aside to dry.


Step eight: Synthetic sponge time! Spray down your green paint and dip your DRY sponge in the paint. Dab the painty-sponge along the green grass to add texture. Rinse out your sponge.


Step nine: Take your damp sponge and rub away some of the blue paint at the top of the picture. Then, spray lightly with water. (And rinse out your sponge, set aside to dry)


Step ten: Sprinkle kosher salt onto the sky. Let dry.


Step eleven: Peel up the house-shaped tape.You'll notice the middle house had some paint seep beneath the tape. No worries!


If this happens, take your small round brush and get it wet. Then rub along the edge with the excess paint. 


The paint will start to bleed.


Dab up the wet paint with a paper towel.


Step twelve: Paint the houses with a wash of purple. Let dry.


Step thirteen: Use blue violet and your small round brush to paint along the roof line, and add doors and windows. Let dry.


Step fourteen: Add details with a permanent Fine-tipped pen, and peel up your tape. Scrape off the kosher salt (I usually do this over the sink).

Congrats! You have just completed your very own watercolor painting!

Some thoughts on working with the wet-on-dry technique: 
It's all about LAYERS. I find that the process can be tedious--especially all of that waiting for things to dry. I try to work under a ceiling fan and with the windows open. When that's not feasible (Midwest winter is not the time for open windows!) I use a hair dryer on cool on the lowest setting--and make slow back and forth motions so that I'm not moving the paint around.

Next time: Wet-on-wet! My personal favorite--it's a little looser, and slightly unpredictable, but it can give you some very pretty results.

Friday, July 06, 2012

Watercolor Workshop: Techniques part two!

Well how do?
I hope your Fourth of July was tons of fun. Ours was spent in the company of good friends, good music, and enthusiastic children.

This post will wrap our wet-on-dry techniques. (Next post will be using the assorted techniques to create a picture.) 

Assemble your supplies! 


Paper
Paint
Water
Brushes (I'm using a 9 round and a 4 round)
Spray bottle
Painters tape 
Scissors

First! We're going to do a technique called masking. It's when you lay down a barrier on the paper to prevent paint from sticking to the surface. There are masking fluids available (Friskit is one), but I prefer to use painters tape. Because I am lazy--it peels up easy, and you don't have to wait for it to dry. And because with your trusty scissors, you can cut shapes out of painters tape.


You can cut simple shapes like hearts, circles, squares and triangles. Then you can combine your simple shapes to make more complex shapes.


Like houses! Or letters and numbers. Or animals...oooh, that'd be tricky...

You can also make irregular stripes by tearing your painters tape. 
Then rub the edges to make sure they are adhered to your paper. 
Paint a wash over the tape. 
After the paint has completely dried, peel up your tape.


You can fill the white space left with doodles, or add another layer of paint.

Technique two! 
Get your spray bottle and fill it with water.
Lay down a wash of paint and spray water onto it.


Based on how close you are/how much water you spray (less is more!), you'll get two different effects.


 The top, being farther away from the bottle, gives a raindrop/snowflake effect.
The bottom, being closer to the bottle, gives a marbleized effect.

So what can you do with these two?
You can make a flag...

Lay down your painters tape, and do a wash of orange-red on the stripes, and cerulean in the field of blue. Spray the blue with the spray bottle from about 6 inches away. Let the paint dry, then peel up your tape.


Next time: wet-on-dry techniques to create your own painting!