Tuesday, April 25, 2006

Layers, layer, layers

here are more layers.
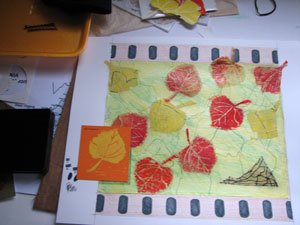
will explain at later date.
must go to studio.
procrastination must end.

Tuesday, April 18, 2006

it's the process, really.


Here they are, in all their glory: Layers 4 and 5.

Layer 4 being prints of leaves, created from blocks I carved based off of actual leaves I had pressed & dried. You just can't beat nature when it comes to design. I printed on to a sheet of tissue paper. Completely unorthodox, but I love the transparency and inconsistencies tissue paper provides. I have attached these using matte medium, which also give the edges a smudgy quality. In all, I dig it.


Layer 5 is the same print block, but done on a paint chip. I can't walk by a paint chip stand without wistfully looking at the variety of colors. Maybe I'll just get myself a paint chip stand of my very own to sit in front of for hours. Although you can't tell here, I've perforated the edges of the paint chip in anticipation of stiching around the edges.

And usually I wouldn't think of having my margins showing, but alas, this unfinished work isn't matted (b/c it is unfinished) In the margins as you can see (peeking around the paint chip) that I make notes to myself, test colors, etc. It's kind of like walking around with your pants tucked into your undies, but there you have it.

Next installment: more layers!

Thursday, April 13, 2006

double secret probation


I'm doing some pro-bono commissioned work for some dudes, but part of the agreement is that I can't tell you what the project is. Nondisclosure and all that. However, there was no mention of keeping the artwork a secret, and I figure I can show you the process if not the actual completed work itself.
So here is layers one, two, and three of the above piece. We'll call it Work 1. It starts with a measured space on bristol board (10" x 10") Which was then divided into 3 sections to replicate a film negative. You with me so far? Good.
Then (after measurements were taken, and things were evenly spaced) The "holes" were filled in with grey marker, and the surround with watercolor pencil--that becomes important later.
Next, I adhered a sheet of yellow tissue paper to the middle section. I then reproduced portions of a topographic map of the Blue Ridge Mountains using colored pencil and watercolor pencil.
I applied a thin layer of acrylic matte medium over the drawing.
Then I sectioned off the rectangle at the bottom left corner, using colored pencil. And finally I drew the outlines of leaves in colored pencil.

Stay tuned for layers 4 and 5!

Thursday, April 06, 2006

print-tastic!

Yarrr...
I have been terribly lax about updating you, dear blog and I apologize. I was in Virginia then I was sick then I was uninspired (and thusly not being arty at all) and now my cup, she overfloweth.
So, what's new with you?
I am helping my dear friend Karlee design some wedding invites--and this-a-here was a print that was kind-of-but-not-really related to that. I am all about the printing of late. I like the process, and I like the endless possibilites you have with your very own, one-of-a-kind stamp.
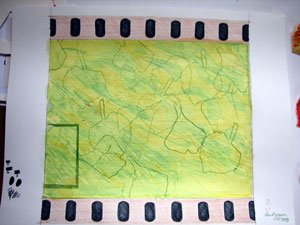
This was the finished print from the above sketch. Not to toot my own horn, but dude--toot toot--check how close the print and sketch are to each other. YEARS of practice and experimenting to get to that point--mostly because I refuse to pay for carbon paper. Why pay for paper that I can only use once? When a heavy hand with an 8B graphite works just as well? I'm no art-dummy.
And the curvy-carvy block herself. I could never be a professional printer because I could never bring myself to destroy a block. That's like throwing a baby in trash--makes no sense no matter how you look at it.

So yeah, I've been busy and neglectful and I'm sorry. I'll try to mend my ways