Friday, August 31, 2012

Photo Friday


Happy Friday to you! 

My weekend involves dropping off signage, dinner with friends, volunteering, the season premiere of Dr Who*, and as much garden time as I can squeeze in. 

What's on your plate for the weekend?

* It's true, I'm a Whovian.

Wednesday, August 29, 2012

Introducing: Artful Wednesday plus Freezer paper stencil tutorial


You guys know about freezer paper stencils, right? They are the BEST for customizing your wardrobe/accessories. I wanted to bring a little something into the house for Fall--something that would last September to November. Don't get me wrong; we LOVE Halloween and absolutely decorate inside and out for it, but August seems too soon for that, and Thanksgiving seems too late. I have always loved birds, and lately my mind has turned to owls (you'll see why later). I decided to make owl pillowcases for some throw pillows. And you can too!

Supplies:
Paper
Felt-tipped pen
Exacto blade 
Scissors
Freezer paper (found in the aisle with the aluminum foil and cling wrap)
Fabric of your choice, or old pillowcases
Iron and ironing board
Fabric paint (soft body in red, white, and yellow; spray in black, orange, and white; and puff paint in white and black)
Sponge brushes for paint


First you'll need a drawing of an owl (or some owl clip art). Blow it up to about 8 inches tall.


Then get your freezer paper and pen out. Freezer paper has two sides: paper and a plastic-coated side. You will be drawing on the paper side. Freezer paper is wonderfully translucent, so tracing is easy peasy!


.

Here's a handy tip: BEFORE you trace anything, make 2 small "x" at the top of your paper


Then, when you put your design under your freezer paper, FIRST mark where those two "x" are. That way if your paper slips (say, you get up to make someone a sandwich and come back to find that small hands have moved your papers around) all you have to do is line up the two "x" and continue tracing.


Once your design has been traced, cut out THE INSIDES FIRST with your exacto blade. This is easier if your blade is sharp. And remember to cut on top of newspapers or a cutting mat.


After you have the insides all cut out, use your scissors to cut on the outer edge. Then set your iron to LOW and place your stencil PLASTIC SIDE DOWN on your fabric. Press for 15-20 seconds. The plastic will adhere to the fabric.


Then get out your paints! I use Tulip brand and I Love to Create brand.


Try painting with the soft body paints and then spraying over top, or spray first and then paint. Let dry according to your manufacturer's directions.


Next, take the face area of the original stencil, place it over your drawing and trace where the eyes and beak will go. Cut those out with your exacto.


Iron the face stencil onto your owl.


The owl on the left was paint and then spray paint, the owl on the right was spray paint and then fabric paint.


Paint the eyes white and the beaks yellow. Again, let them dry according to the package directions.


Once they are dry, peel up the stencil paper--it comes right off. Tumble dry on high for 15 minutes to heat-set the paint.


Next, I got out my puff paint in black and white, and used that to trace over where the stencils had been. Lastly, I added some details with a Sharpie pen.


Two pillows to welcome the Autumnal season into the house. 

What are your favorite ways to bring Fall indoors?


Sunday, August 26, 2012

Introducing: Quote of the Week (and chalkboard tutorial)


This week the kids are headed back to school--yipee! Fiona starts kindergarten and Adrian will be in second grade. Over the last few weeks, the mister and I have come up with a rough set of rules in order to smooth the transition from carefree summer days to the structure of school. 

One of my goals for the upcoming school year was to give the kids some positive thoughts as they head out the door in the morning. And since 365 quotes is way beyond my level of committed-ness, I figured a quote per week should do it. 

So then where was I going to put all these quotes? On pieces of paper, stuck to the back of the front door--please, no; I'm already drowning in piles of paper. Thinking....thinking...thinking...WE NEED A CHALKBOARD QUOTE BOARD! And I happen to have scrap lumber and chalkboard paint! How convenient! (I am seriously in love with chalkboard paint). 

If you want your very own chalkboard quote board, follow these easy steps.


Assemble your supplies! Chalkboard paint, scrap lumber, and a brush or a roller. (Looks like it's time to refinish that bench, hunh?)

Oh look! Busted dresser drawers! I'll paint those with chalkboard paint too! (2 coats on the left, 1 coat on the right) These will show up again as a completely separate tutorial (who's crazy for chalkboard paint?)


Hey, there's the lumber! Looking good....I did 3 coats of the paint & then let it dry overnight in the garage.


The next day I brought the board inside, got some fancy schmancy scrapbook paper (left over from Fiona's Fancy Nancy tea party), my paper cutter, a sponge brush, and some ModPodge (matte finish). ModPodge is invaluable if you want to stick different materials together or if you want to seal paper/collages. 

Measure the side of your board & cut your paper to fit. My board was 1/2 inch thick, so I cut 4 strips of 1/2 inch paper. Use ModPodge to adhere the paper to the board. Once the ModPodge has dried, seal over the top with a thin layer of ModPodge. Why? Why not! No seriously, it will keep the paper from peeling up and yellowing with age.


Next, get out some wire (16 gauge or so), some glass beads that will fit on the wire, some pliers, some wire cutters, and some screw eyes.


Affix two screw eyes to the top of your board. I am a lazy measurer, so I measured three finger-widths from the edge. Then take your wire and cut a length as long as your board is (so if your board is 12 inches, your wire is 12 inches). Loop one end of the wire through the screw eye and twist up the end to make a loop.


BEFORE you loop through the other screw eye, put some beads on there! If you're going to be staring at it all year, why not make it worth staring at?!


Look at that paper! LOVE it!
Then loop your loose wire end through the screw eye and wrap around the wire like you did before. 
Then pinch the wire together in the middle, and twist it 4 or 5 times to make a loop for hanging.


Hang it wherever suits you. I have mine above the coat rack by the front door. 


Before you write on it, make sure it cures for a few days (per manufacturer's instructions) and that you prep it by adding a layer of chalk dust. All of that should be on the paint can, so read your directions!

Check in every Monday for our Quote of the Week!
What are some of your favorite quotes?! 


Friday, August 24, 2012

Preview: Photo Fridays!


Ooh! I'm so excited! Starting next week I will be rolling out a brandy new blog design and weekly plan. Here is a sneak peek of some of next week's projects! 

Photo Fridays will be a regular installment, starting today. 

Tune in Monday to see what else is coming down the pike!

Have a super fun weekend!

Sunday, August 19, 2012

Photography lessons!


Last week I took an online product photography class on Craftsy.com (You've never heard of Craftsy? Check it out! I'll wait!) 
I spend a whole bunch of time MAKING art, but when it comes to photographing it....well, that's the task I apply the power of procrastination to. I just felt like my photos were blah. And photographing them was blah. The whole process was a landscape of blah, wrapped in a scarf of blah, served with a side of blah soup. And I'd much rather read some blogs, or search Pinterest, or do the dishes....

The class was called Shoot It! with Caro Sheridan. I totally recommend it. It help me to take my photos from 

THIS


To THIS


And from this


to THIS


Way more interesting, in focus, and wow.

I still feel like I'll need model shots to give the brooches a sense of scale, but I'm much happier with the colorful photos than with the white box ones. 

What are your thoughts on the before and afters?


Friday, August 10, 2012

Watercolor workshop: wet in wet tutorial: Cardinal Painting

Here we are! Our final tutorial for this watercolor workshop. Sad panda! But there will be future tutorials and future workshops, so fret not my friends!
 Today, we are going to make a painting of a cardinal on a branch. You can frame it, pin it on a cork board, fold it in half and turn it into a card. Or a book cover!


We'll need various supplies, so get them out and ready!


Watercolor paper (for real, because it's going to be messy) 5"x7"
Pencil with eraser
Paint
Brushes (large flat, medium round, small round)
Water (2 jars--one for clean water & one for rinse water)
Painter's tape
Stamps (a floral motif works best for this one) & stamp base block
Dye ink pad in a dark green
Towels: paper & terrycloth (I use the terrycloth to absorb extra water from my brushes)

First, tape down your paper making a 1/2" border around the edges. Then sketch a cardinal on the right 1/3 of the paper, and give him a branch to sit on. Tutorial on drawing a cardinal here.


Once you have your cardinal done to your satisfaction, take your flat brush and dip it in the clean water. Paint with water from the outside edges right up to the cardinal and branch. KEEP YOUR BIRD and BRANCH DRY!


Next, take your medium round brush and load up on the darkest green you've got. Start in the bottom left corner and paint upwards until you run out of pigment. If you want it darker, load up your brush again and start in the same corner.


Then rinse your brush and load up on medium green. Start at the top left corner and work diagonally down the page. Overlap your colors!


Rinse your brush again and dip into your light green. Start at the branch and work up towards the medium green. Overlap your colors!


Work around the front of your bird, and then start under the branch with the medium green. 


Add dark green to the bottom right corner, and light green to the top right corner and down to the branch.


Take your paper towel and fold it into a triangle that will cover your bird. Place the paper towel over the bird. Take your medium round brush, load it full of medium green and spatter all over the page.


While this is still damp, take your stamps and load them up with ink. 


Then stamp all over the page. Add more ink as needed.


Next, paint on your stamp with yellow. And stamp all over the page again. Add more paint as needed.


Last time with the stamp! Paint it medium green and stamp away!


Load up your medium round brush with water and spatter the whole thing with water.


Blot up the water with a paper towel. (I have been using the same paper towel the whole time)


Next we'll do the branch. Start with the medium round brush and do a very pale wash of yellow. How do you do a pale wash? More water, less paint. You can paint the branch with water first and then add the yellow. You can paint the branch with yellow and then add more water. You can do either technique and then blot the whole thing with a paper towel. Just make sure it's pale yellow.


With your branch still damp, take your round brush and dip it in the brown paint. paint along the underside of the branch. Then tease the paint up with your brush. I like to use up all of the paint, then dip my brush in water to clean it, wipe in on the towel so it's not sopping wet, and then go back into the brown and push it around.


Once you've done the bottom of the branch, do the top--with slightly less paint. Make sure to leave a bit of the pale yellow exposed.


Finally, the bird!Using your small round brush, paint the beak bright yellow.


Directly over that, paint with orange.


Use your paper towel to lightly blot up the paint.


Next, fill in the body of the bird with clean water.Leave the face mask dry--it'll be black later. Use your medium round brush and red-orange paint to lay down a wash over the whole body.


Starting to look like a cardinal, yeah?


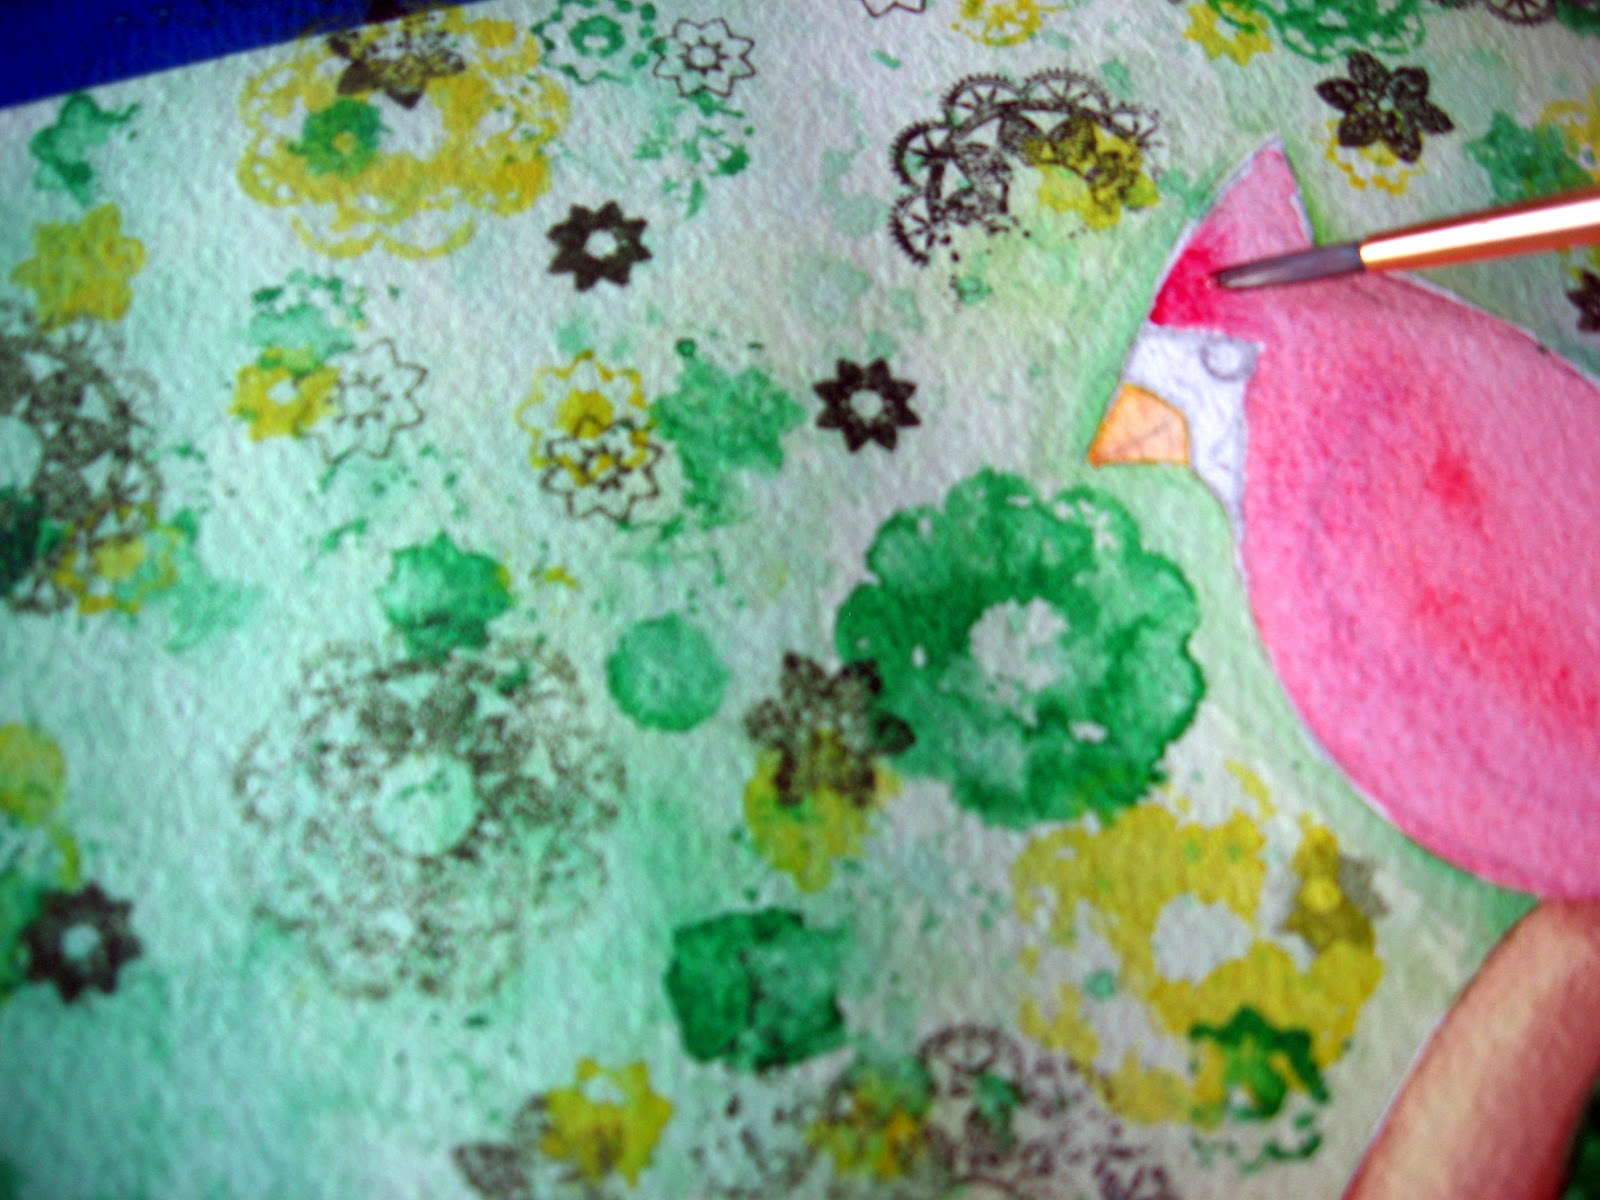
Take your small round brush and load it full of red. Paint along the front outline of the bird.


Paint along the wing and the tail feathers.Where the two wings meet at the bottom of the body, make a "w".


Add some lines to suggest flight feathers.Add red under the wings to create a shadow. Add red to the back of the bird and to his head.Add extra red around the face and chest.


Go over the body again with the red-orange. Leave a small crescent on the wing and on the belly--this suggests where the light is coming from.


Next, take your small round brush and using your red-purple, paint under the wings and the tail feathers. Using orange, outline the beak and the beak-line (where it would open). 

Wait five minutes or so--go to the bathroom, grab a quick snack. You want the head of the bird to be a little bit dry before you paint the face mask. Rinse your brush and load up on black. Paint the face mask.


For this next part, move super slow. Paint the eyeball, starting from the back. leave a thin crescent of unpainted paper at the front. (Or wait till the whole thing is dry and draw it on with a gel pen)


Once it's dry, pull your tape up and admire your finished work! 


Well done, you! And way to power through the whole workshop! 
If you have any questions, please email me! KaraCrafts(at)gmail(dot)com.