Showing posts with label Tutorials. Show all posts

Tuesday, August 27, 2013

COLOR, the basics

Hi there! This is a study break for me, while I let my brain absorb all of the acronyms and new vocabulary I have just stuffed in there. Classes started back yesterday...sort of...there was a problem with the server so only 1 of the 3 were uploaded and accessible to those of us taking online classes and HOLY EYEBALLS IS THERE A LOT OF READING IN GRAD SCHOOL.

But that has nothing to do with why we are here. We are here because of COLOR. Unless your eyeballs are also run through the television tubes of the 1950's color is EVERYWHERE. And everywhere you go it is intentional. Corporations, retail establishments and even schools are using color to affect you. You can learn to wield your very own wand of color to do your bidding once you understand how colors play together.


These are your primaries.
 That means that you can't mix them, you have to buy them
 (or mine them if you are hardcore into your art)


Mix your primaries together and you get secondaries.


Look at the happy color wheel! 
If you never did one of these in school you are missing out. 
This is the color-coordinators bible. Once you understand where 
these guys sit, you are ready to move forward.


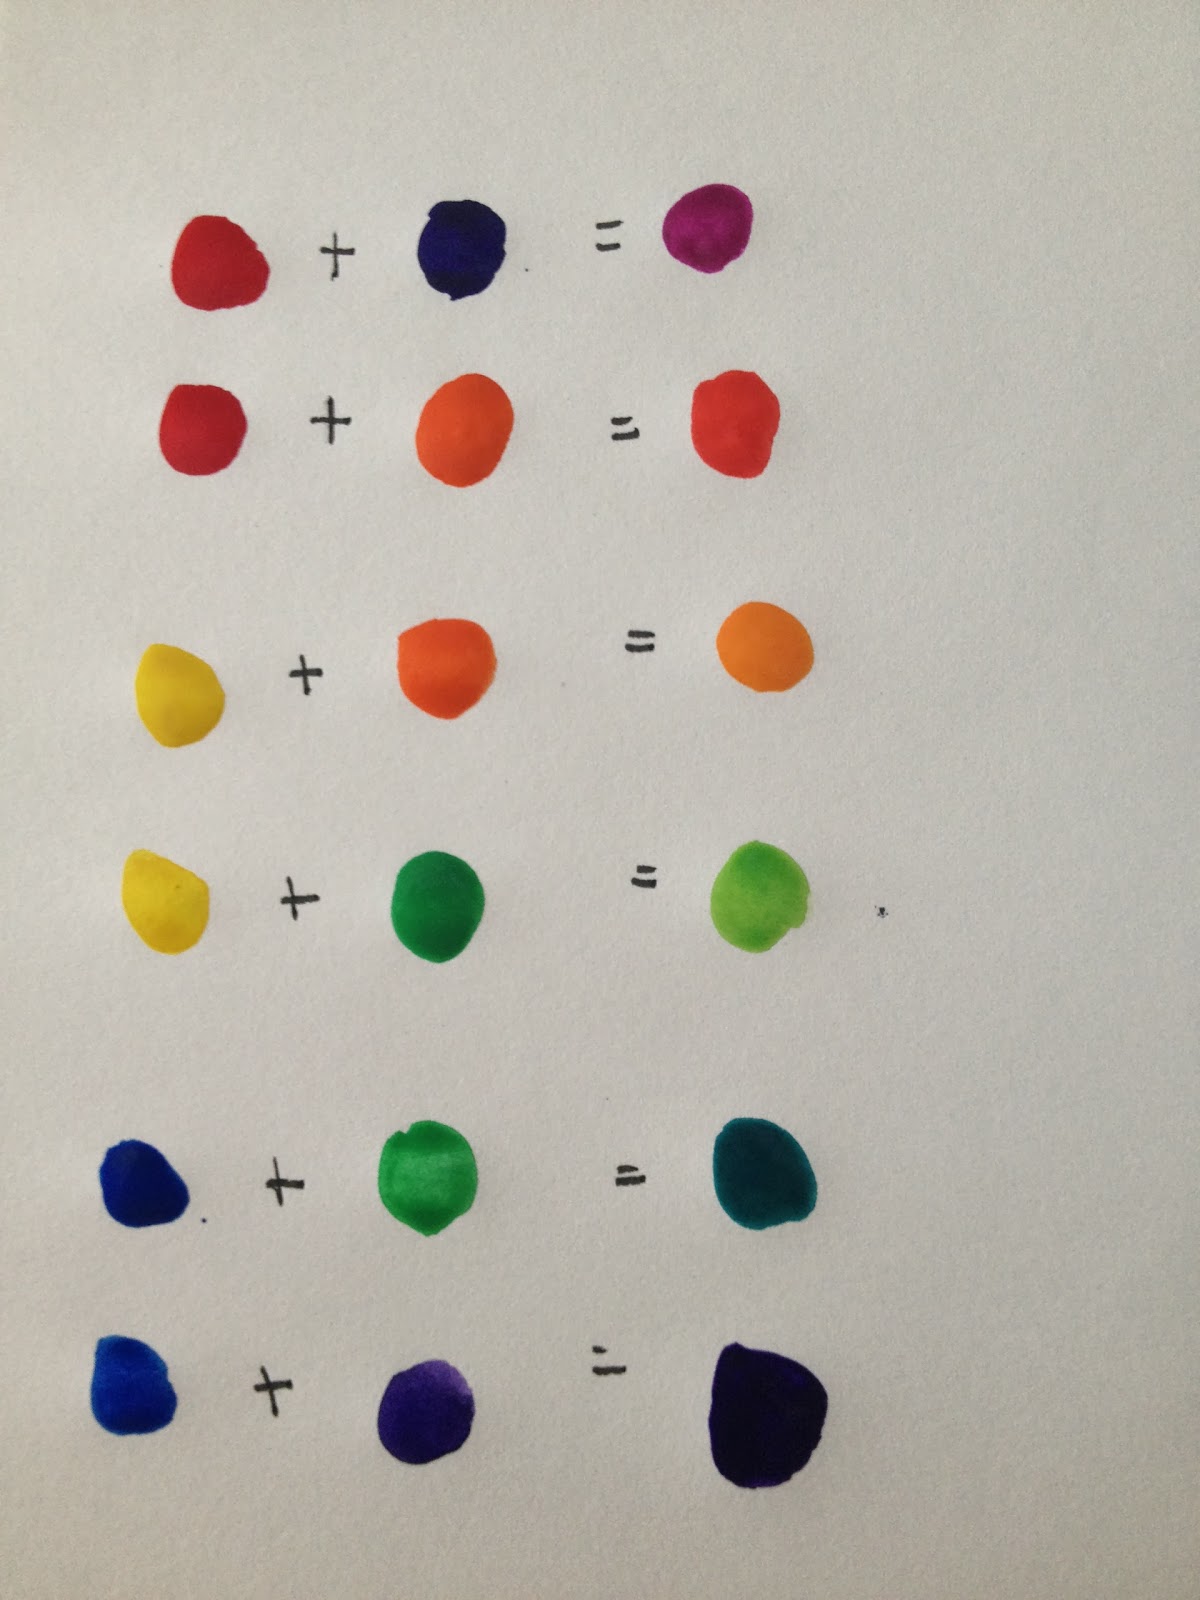
Then you can add your primaries and your secondaries to get tertiaries. 
The color-math keeps going this way until you run out of colors. (I think a 24 bit RGB monitor can recreate something in the order of 16 million colors)
So now you can mix colors...

What about complementary colors?

Complementary colors sit across from each other on the color wheel. 
If you think of it as a clock face, 3 and 9 would be complementary. 
As would 12 and 6, 1 and 7, and so on. 
They are called complementary because they create a visual tension that we find pleasing. 
If you were to mix them you would wind up with brown.

This is a color wheel with primaries, secondaries, and tertiaries. 
Beneath the wheel is complementary color matches. 

Ready for some more? 
Using your color wheel isolate 3 colors that sit next to one another. 
This is called an analogous grouping. Once again this arrangement is visually pleasing.

By using three analogous colors, you can harmonize your pallet. 
Whether you are painting a still life or redecorating, 
understand color relationships can make your work sing.

We can talk a little about the meanings behind colors, but the meanings will change based upon cultures. 
All of the meanings I will share come from a Western European interpretation.

RED
Exciting, hot, passionate or danger, aggressive, violent

ORANGE
Fun, happy, child-like or loud and over-bearing

YELLOW
Joyful, lively, enlightening or hazardous or cowardly

GREEN
Fresh, trustworthy, prosperity, traditional, nature

BLUE
Calming, cool, peaceful, faithful*, dependable

PURPLE
Meditative, sensual, royal, dramatic, mysterious

BLACK
Powerful, elegant, mysterious, strong or death, mourning, and the underworld

White
Pure, clean, innocent, airy, ethereal, efficient or clinical, cold

GREY
Classic, timeless, neutral, logical, deliberate, and methodical


Next time you go shopping, or to eat, or anywhere pay attention to the colors. They are sending you a message! You can use the meanings behind colors to send your own messages in your home, wardrobe, and art work. 

What's your favorite color? Use that with it's complement and see what you think. Mine is BLUE so I would pair that with ORANGE. Not my favorite combination, but there is a reason so many universities use the blue-and-orange combo.

There are lots of little tricks that I like to use when doing art work or decorating. 
  1. Don't underestimate the power of a neutral color! I use tan, brown, and grey as neutrals as well as white.
  2. Contrast is your friend. It can be a little scary at first, but start small and work into it.
  3. Paint can always be painted over. I painted a brown accent wall in my dining room 3 years ago on a whim. I still love looking at it. I painted my kitchen a shade of yellow that has been burning my eyeballs this summer--time to repaint!
  4. Any color combination found in nature will ALWAYS work. Mother Nature is the ultimate designer!
  5. Ask small people what they think of your color choice. They will always be unabashedly honest.
  6. Make mistakes and learn from them
Now get out there and make color work for YOU!

*This is why brides carry "something blue" on their wedding day.

PS- there were a lot of references to eyeballs in this post. Completely unintentional.


Thursday, August 22, 2013

Watercolor Resist with crayon.

Possibly my favorite resist technique of all time. It's super easy and more than a little addictive...

Crayon, meet paper.

Draw! 
It helps to work in a room with strong light on one side--
you can kind of see your white crayon marks on the paper.

Paint!

The darker the paint, the better your writing will show.

Red, orange, purple.

Load your brush with A LOT of wet paint. 
Paint a stripe along the bottom of the page and

Flip it upside down. 
You may want to add extra paint to the orange stripe to help it run.

Lay it flat.
Fun!

If it's puddling somewhere you don't like, dab it with a paper towel.

Wet...

Dry.

Let's do more! 
White gel pen + doodles.

Taa-daah!

Saturday, August 10, 2013

Watercolor Workshop: Resist With Glue

So last week I mentioned that I had tried glue resist and had a request for a tutorial. This one is for you, Angela!
While doing this tutorial, I learned something new and kind of cool about working with glue.Cool enough that I may not swear off this technique after all. Curious? Read on. 


My birthday is Monday, so more cake just seems appropriate. 
To start, you will need white school glue (I used Elmer's) and paper (preferably heavier paper 70lb-press or more, so when you watercolor the paper doesn't pill)

 Draw on your paper with the glue. Keep in mind that whatever you do needs to be loose and flowey. School glue doesn't do sharp edges and right angles very well.


When you get to the end of a word, double back as you release your pressure on the bottle. It minimizes the stringy ends.

You can leave it at just words.


Or you can doodle around the edges.


Let that dry for a couple of hours or overnight. I let mine dry overnight--it minimizes the stickiness of the next part. 

Get out your watercolors and a nice big round brush.(I used an 8)


Wet up your watercolors by dripping water off of your brush and into the the paint wells.


Load up your brush with water and then with paint, and start painting. 


 As you move around the page, your designs will start to appear.


Switch colors and keep pushing that paint around.


Add a third color and keep painting.
You will notice that the letters show up better when the paint is darker. We are going to outline them later, so just get down with whatever colors move you.


Once your paper is full, you can add a line of color around the edge. I think a border keeps the eye on the page.


And because I can't get enough of layers, lets go ahead and spatter some more paint on there. I used two colors, red and magenta.

 Looking good! That needs to dry, so set it aside. Depending on the weight of your paper it could be dry in 30 minutes or in 3 hours. If the paper feels cold to the touch, it's still damp.


All dry!

Get out a permanent pen. I'm using a fine-tipped Pitt pen. It's a felt tip and I love the way the ink flows from it.


Outline your words.


POW! They really pop, don't they?

Now, here is the interesting thing about school glue. Once it is dry, you can color on it with colored pencils. How cool is that?! 
Go ahead and bust those babies out.


And color on your glued bits. I was enjoying this more than I should have, probably.


So there you go. Glue resist. Fairly easy for all ages. 
And while I was waiting for things to dry, I worked on another tutorial for next week. 
Have a super awesome weekend!


Thursday, April 04, 2013

In between Wednesday and Friday

Hi! I am crazily trying to get all of my stuff in order before I head out this weekend to Goddess Weekend; where I will be vending and sitting in sunshine. Oh how I love the lovely sunshine. I thought I'd take a quick break from my crazy packing and list-checking to share with you a quick, thrifty, stash-busting, colorful craft.

Wind socks! I know. Crazy is the word of the day. Maybe it's because I live just south of the Windy City and Spring here is more about the wind changing (from the northerly-cold to the southerly-warm) than it is about the rain. Maybe it's because I'm drowning in my fabric stash. Maybe it's because I am addicted to color and shiny things. But, seriously. Look at them:


Colorful, cute, fun. Everything I like about...everything, really. 
Go gather your supplies: 


  • An iron and ironing board
  • Scissors
  • Tacky glue
  • Embroidery floss and ribbon
  • Assorted fabric
  • Mason jar lid ring (pop out the flat middle part)
  • Bells
  • Fusible webbing (I like WonderUnder because it has a paper backing. And if you are into any kind of fabric craft, go get some RIGHT NOW)
  • Clothespins (not pictured) 4 per wind-sock


 First, plug in your iron and set it to HOT. While that warms up you can get out your fabrics.


Decide on what color you want your top to be. Wrap the ring inside the fabric and measure where the ends would meet. Then cut your fabric to that length and TWICE the height of the jar lid. (So if your lid is 1/2 inch tall, and 6 inches around, your fabric would be 6 inches long and 1 inch wide)


Then iron the fusible webbing to the underside of your fabric. (Each brand of webbing has it's own directions on how long this takes. Ask the nice people at the fabric store if you're unsure)


Crease it down the middle and cut two angled slits in your fabric. This will allow the fabric to sit flat when you fold it inside the jar lid. 


Get out your other fabrics and ribbon. Cut strips of  fabric and ribbon in various lengths. You'll want to have enough to overlap onto your top fabric.


Peel the paper backing off of your top fabric and arrange your fabric and ribbon strips onto the half of the fabric that is intact.


If your ribbon is polyester, lay a strip of fabric across the top so you don't melt the ribbon and get it stuck on your iron. Iron the strips onto the top fabric. REMEMBER THAT THE TOP HALF HAS FUSIBLE WEBBING STILL ON IT. Don't stick your iron on there, or you'll be cleaning gunk off of it...if you do get gunk on it, get out 2-3 paper towels and lay them on top of each other. Then rub your iron back and forth vigorously. Fold your paper towels in half and repeat. It takes about 4 fold-and-rubs before your iron will be de-gunked. (Not that I know from experience, or anything...ahem)


Once all of your strips are stuck to the top piece, lay a bead of tacky glue the length of the fabric. (I forgot to take a picture with the original one--haha, oops!)


This is what it looks like rolled up. Have the flat edge of the jar lid in the middle of your fabric...


Because we're going to put a bead of glue on it. And then fold down the fabric to the middle.


And then flip the whole thing over, so you can see the exposed metal rim inside.


Put some glue in there too. Press the fabric down into the glue, and hold the whole thing together with clothespins until the glue dries.


While that's drying, you can go ahead and tie the bells on to the ribbons.


If your knot-tying skills aren't super-awesome, you can put a drop of glue onto the knot.

After all your glue is dry, tie your embroidery floss onto the rim to hang it. I recommend three pieces of floss at 16" each. Tie one end to the rim, and then knot your three loose ends together and hang from that knot.


Have a wonderful sunshine-filled weekend!