Friday, July 06, 2012

Watercolor Workshop: Techniques part two!

Well how do?
I hope your Fourth of July was tons of fun. Ours was spent in the company of good friends, good music, and enthusiastic children.

This post will wrap our wet-on-dry techniques. (Next post will be using the assorted techniques to create a picture.) 

Assemble your supplies! 


Paper
Paint
Water
Brushes (I'm using a 9 round and a 4 round)
Spray bottle
Painters tape 
Scissors

First! We're going to do a technique called masking. It's when you lay down a barrier on the paper to prevent paint from sticking to the surface. There are masking fluids available (Friskit is one), but I prefer to use painters tape. Because I am lazy--it peels up easy, and you don't have to wait for it to dry. And because with your trusty scissors, you can cut shapes out of painters tape.


You can cut simple shapes like hearts, circles, squares and triangles. Then you can combine your simple shapes to make more complex shapes.


Like houses! Or letters and numbers. Or animals...oooh, that'd be tricky...

You can also make irregular stripes by tearing your painters tape. 
Then rub the edges to make sure they are adhered to your paper. 
Paint a wash over the tape. 
After the paint has completely dried, peel up your tape.


You can fill the white space left with doodles, or add another layer of paint.

Technique two! 
Get your spray bottle and fill it with water.
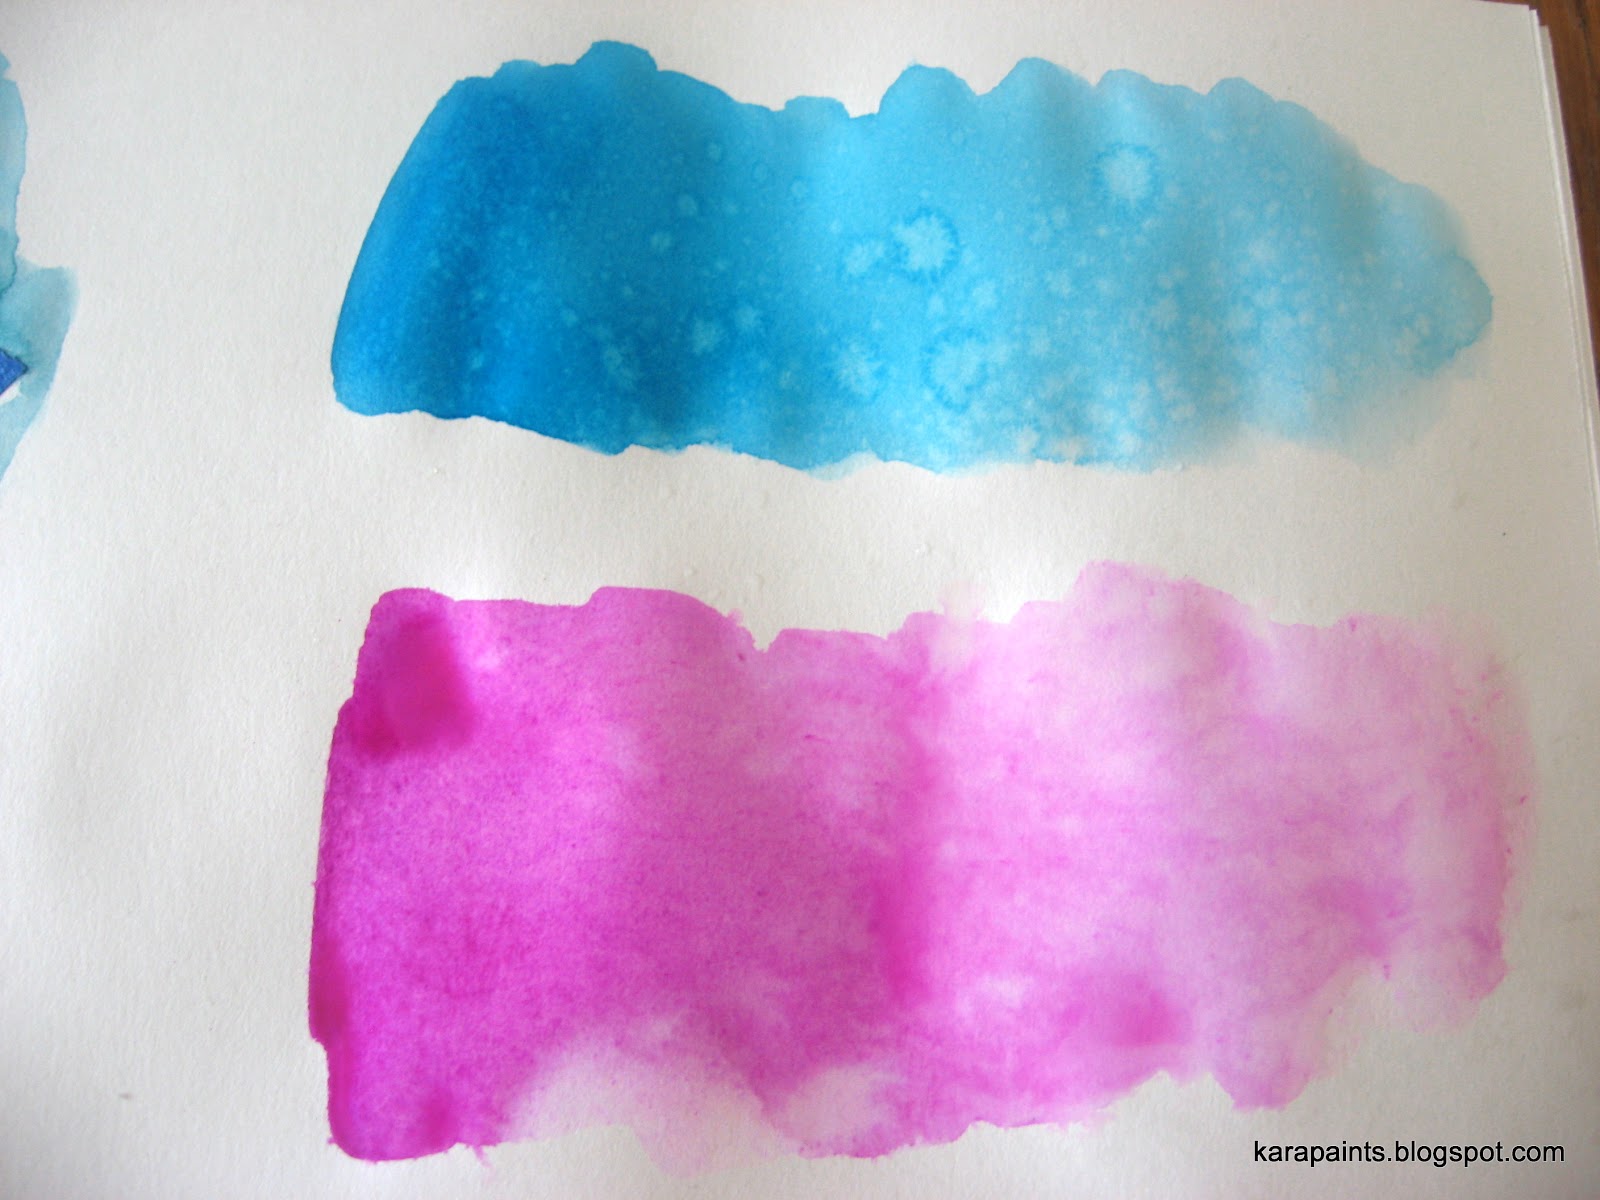
Lay down a wash of paint and spray water onto it.


Based on how close you are/how much water you spray (less is more!), you'll get two different effects.


 The top, being farther away from the bottle, gives a raindrop/snowflake effect.
The bottom, being closer to the bottle, gives a marbleized effect.

So what can you do with these two?
You can make a flag...

Lay down your painters tape, and do a wash of orange-red on the stripes, and cerulean in the field of blue. Spray the blue with the spray bottle from about 6 inches away. Let the paint dry, then peel up your tape.


Next time: wet-on-dry techniques to create your own painting!

Saturday, June 30, 2012

Independence Day Bunting Tutorial


Because nothing says "Happy Birthday, America!" like tri-color bunting. 
I've kept the pattern generic enough that you can use it for Memorial Day, Veteran's Day, Bastille Day and your 17th May celebrations. I'm sure that there are other countries who use a Red-White-Blue color scheme as well, so feel free to get festive in a global manner.

Let's get Crafty.
Gather your supplies!


Two sheets of 11"x14" paper
Ruler--I like an 18" ruler, myself. (Insert bad George III pun here)
Pencil
Scissors
Watercolor brushes--one large, one small
Kitchen string--usually for trussing roast birds, but I find it to be an invaluable addition to the art cupboard.
Watercolor paint


 Step one: Measure!
On the long edge of your paper, mark at 3.5", 7", and 10.5".
Do this on the top & bottom edge


Step two: Connect the dots!
La la la, connect the dots!
From the top left corner to the bottom 3.5" mark.
From the top 3.5" mark to the bottom 7" mark.
From the top 7" mark to the bottom 10.5" mark
From the top 10.5" mark to the bottom right corner.

It's diagonal, baby!


Step three: Reverse!
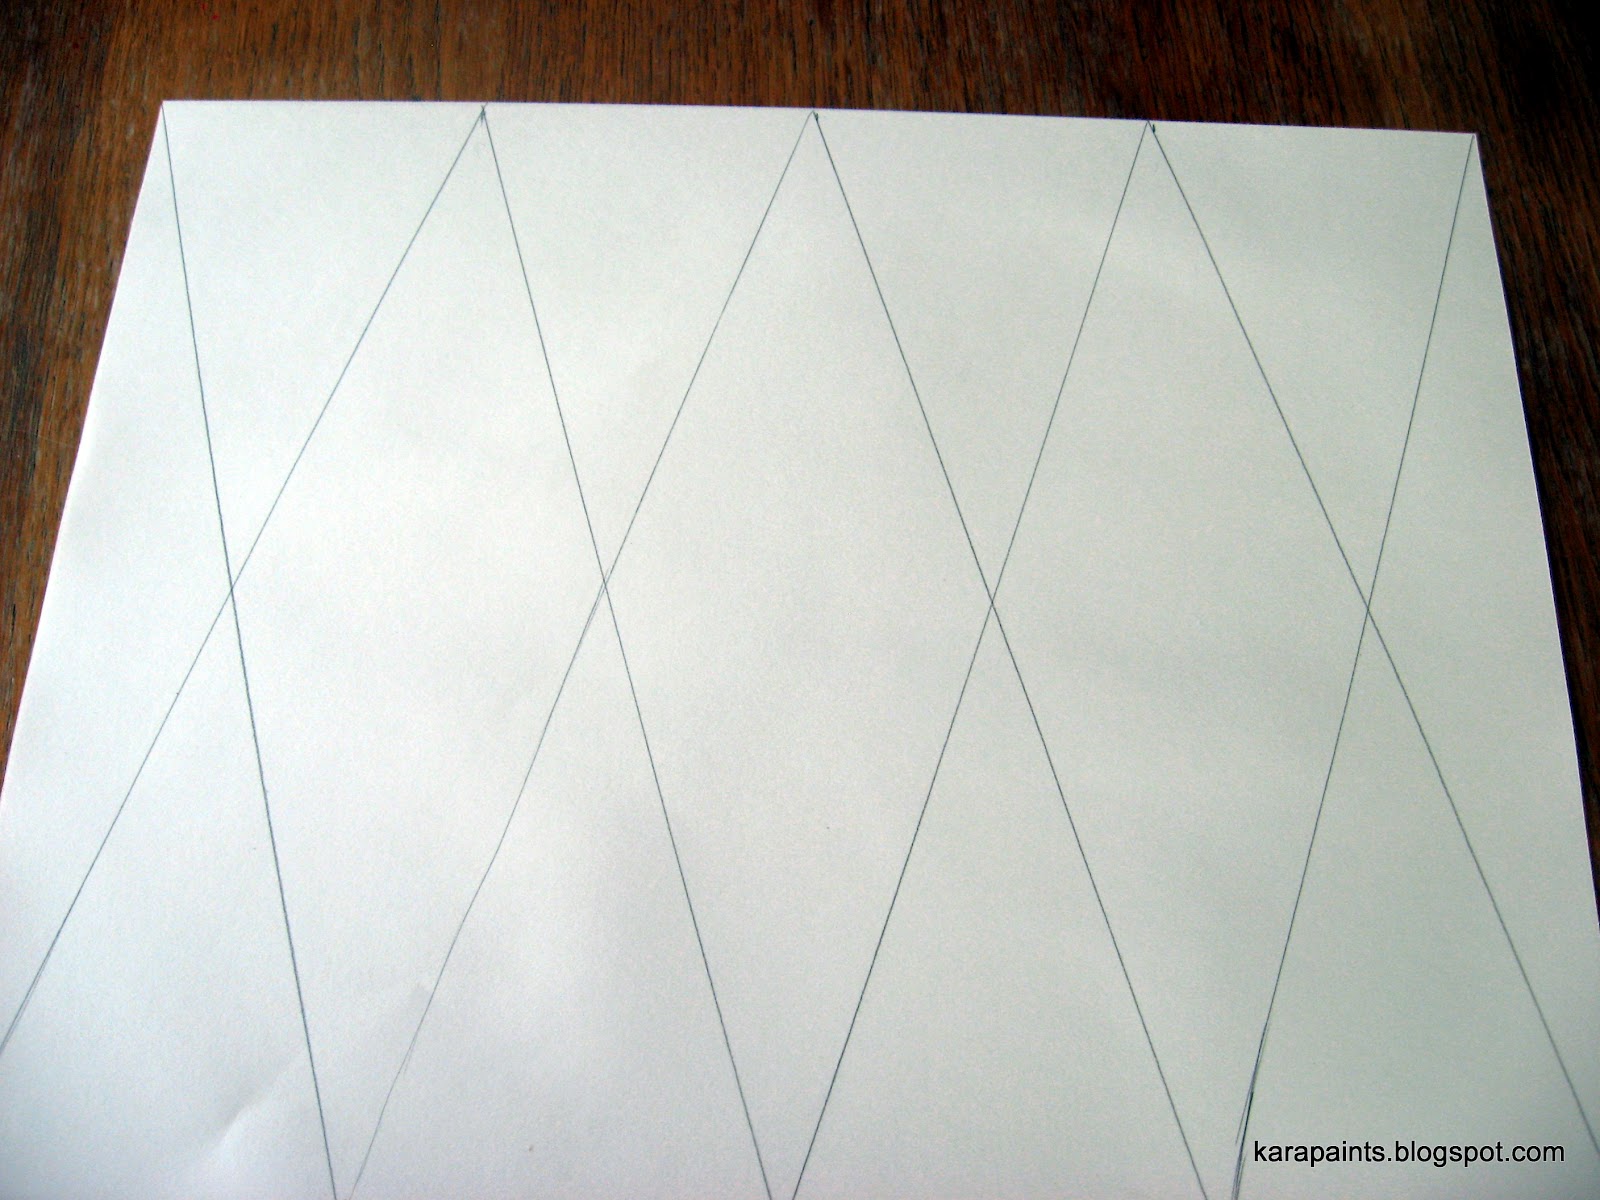
Connect the dots:
From the top right corner to the bottom 10.5" mark
From the top 10.5" mark to the bottom 7" mark
And so on and so forth. When you're done, it should be a lovely diamond pattern, like the above picture.


Step four: Draw a line that bisects your diamonds & turns them into triangles. This should be about 5.5" up the page.

Next: BRING OUT YOUR PAINT!


Step five: On one sheet, free-hand horizontal lines in red with your big brush. On the second sheet, free hand vertical lines. 
No, seriously. Free-hand them. You're making a bunting that is unique to you, not machine made! Also, the squiggles aren't obvious once you cut out your triangles.
Let your red paint dry.


Step six: On your horizontal-line sheet, free hand a blue line with your small brush in the white space.On your vertical-line sheet, use your small brush to make polka-dots down the page in the white spaces. Let your paint dry completely.

Step seven: Cut out your triangles--follow the lines you drew before the painting happened.


Step eight: Stack your triangles 4 deep, and pop holes in the top with your hole punch. Make sure your holes are at least 1/3" from the edge to prevent tearing while you string them up.


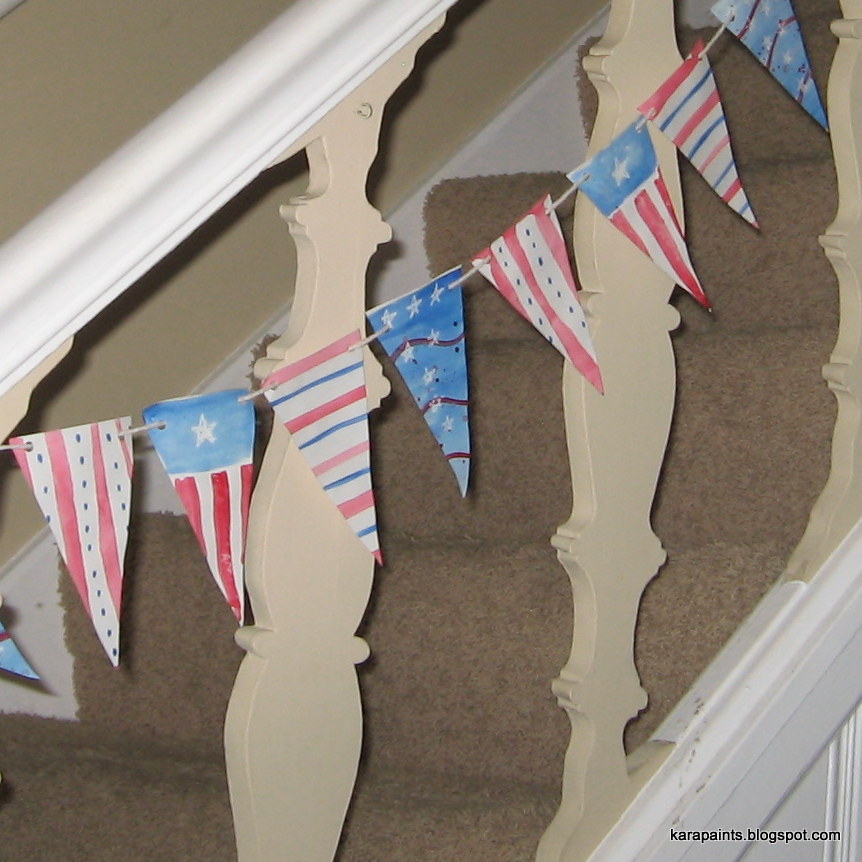
Step nine: Thread those bad boys up. I went with a simple A-B pattern, but if you're working with kids have them pattern it however they want. Below is an overhead shot of the threading technique.


Taa-daah!
 I cut 7.5 feet of string, and it I had 5 flags left over. You could cut 9 feet and use them all.


Tie a loop at the end of the string. This way you can hang it on a nail, or hang it using tape. Also, it keeps your flags on the string while you carry it around the house.


And if you have a few triangles left over, you can pull out some skewers and make flags!


Now even your potted plants can feel the festive air! (Or you could stick them in a cake, a flower arrangement, a toy boat, or your hair)


Happy Independence Day, y'all!


Wednesday, June 27, 2012

Watercolor Workshop: Techniques!

Welcome welcome!

When I think about watercolor techniques, I like to divide them into two categories, so that's what we'll do here. 
Get out your supplies: paper, paint, brushes, paper towels,white crayon, and two containers of water. One to rinse, and one to dip in for fresh water--this way you can avoid your lighter colors turning to mud in your palette.


Ready? OK! Here is where I explain the two category idea.
 Category one: Wet on Dry. This means: wet paint on dry paper. Wet paint on dry paint. This can help you build up layers of color, or combine techniques to create a really nifty effect (this is how you get bricks that look like bricks and stone that looks like stone).
Category two: Wet on Wet. This means: wet paint on wet paper. Wet paint on wet paint. If you look at the image below, you can see the difference most clearly in the 2 bottom examples--the graded wash.
If you want your colors to blend softly, use the wet-in wet. 


 This week and next week we'll be doing Wet on Dry.
You'll need to gather up some household supplies for these week lessons.


Kosher salt
Table Salt
Paper towel
Terry cloth towel
Spray bottle
Painter's Tape
Synthetic sponge
Natural (sea) sponge

I like to make a note at the top of my page, so that when I look back later I can remember what I was working on.


To start, pick a color, any color. I chose blue and purple because of the high-contrast value--it would be easier to see what I'm talking about here.
Grid up your paper again. You'll need sixteen squares when we're all done.

SQUARE ONE: Kosher Salt
Lay down a wash of color*. Sprinkle Kosher Salt in the wet paint. When the paint is COMPLETELY DRY, brush off the salt crystals. This leaves you a nifty snowflake like effect.

* "a wash of color" is when you load your brush up with wet paint, and fill in a space with the paint.

SQUARE TWO: Table Salt.
Lay down a wash of color. Sprinkle Table Salt in the wet paint.When the paint is COMPLETELY DRY, brush off the salt crystals. This leaves you a smaller snowflake like effect.

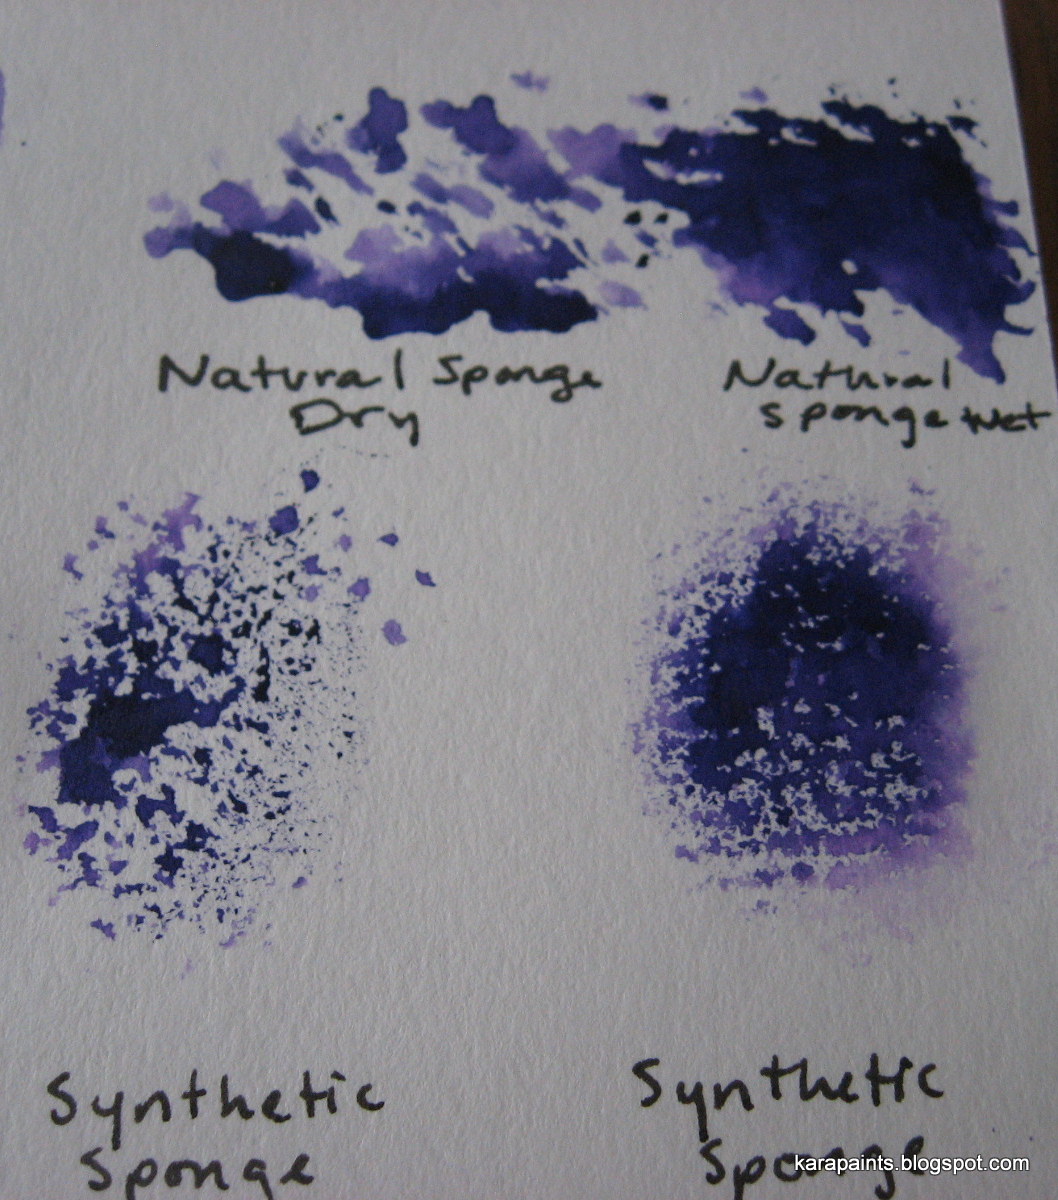
SQUARE THREE: Natural Sponge, Dry
Lay down a wash of color. Blot up some of the color with the sponge.

SQUARE FOUR: Synthetic Sponge, Dry
Lay down a wash of color. Blot up some of the color with the sponge.

SQUARE FIVE: Natural Sponge, Wet.
Lay down a wash of color. Blot up some of the color with the sponge.

SQUARE SIX: Synthetic Sponge, Wet.
Lay down a wash of color. Blot up some of the color with the sponge.

SQUARE SEVEN: Natural Sponge, Dry.
Get your paint good and wet. Dip the sponge IN THE PAINT and apply to the paper.

SQUARE EIGHT: Synthetic Sponge, Dry.
Get your paint good and wet. Dip the sponge IN THE PAINT and apply to the paper.

SQUARE NINE: Natural Sponge, Wet.
Get your sponge wet, and squeeze out all of the excess water. Get your paint good and wet. Dip the sponge IN THE PAINT and apply to the paper.

SQUARE TEN: Synthetic Sponge, Wet.
Get your sponge wet, and squeeze out all of the excess water. Get your paint good and wet. Dip the sponge IN THE PAINT and apply to the paper


Using the blotting technique.

Using the sponge instead of a paintbrush.

SQUARE ELEVEN: Blot with Paper towel.
Lay down a wash of color. Blot up some of the color with the paper towel. Some of the texture from the towel should leave an imprint in the paint. You can try folding the towel and seeing what kind of results you get from different edges.


SQUARE TWELVE: Blot with a terry cloth towel
Lay down a wash of color. Blot up some of the color with the towel. This will give you a softer, more diffuse look.

SQUARE THIRTEEN: Splatter!
Load your brush with color, pull bristles back with your thumb and slowly release.


SQUARE FOURTEEN: Splatter over a wash.
Lay down a wash of color. Let it dry completely, then splatter paint over the top.


SQUARE FIFTEEN: Wax resist
Draw on your paper with a white crayon. Lay down a wash of color.

SQUARE SIXTEEN: Wax resist over a wash.
Lay down a wash of color. Let dry completely. Draw with a white crayon. Lay down a wash of a second color.


There you go! Five techniques: Salt, Blot, Sponge paint, Splatter, and Wax Resist. 
Mix and match three and see what you like best. 

Next time we'll add a few more techniques, and then I'll talk you through using these to create an image.