Who loves books? I DO! I am completely guilty of reading 200 pages instead of doing housework.
These sweet little books made of polymer clay are perfect for the readers in your life. Use them as gifts alone, or to pin a ribbon around that book you bought them. The half dozen I made last night are going to the kid's teachers as part of their holiday gifts.
Let's get making!
Supplies:
PLIERS: Always handy, but these are used to manipulate the wire if you want your pin to be a pendant instead
POLYMER CLAY: Two colors for the cover (I like a quasi-dark color and something metallic) and white and ecru or butter cream for the pages.
TLS: Translucent Liquid Sculpey (it's your glue for your pin back)
WIRE: for a pendant instead of a pin
RUBBER STAMPS: we're looking for interesting textures. (If you don't have rubber stamps, you can use a bit of lace or a doily, or some window screen--get creative)
PIN BACKS: it's just easier than messing with a safety pin. Trust me. You can pick up a large pack for about $4.
TOOLS:
NEEDLE TOOL: or just a straight-up sewing needle. Make sure it's for button thread. You need one that won't bend under pressure
CUTTING BLADE: a sculpey blade or an exacto or a sharp kitchen knife
RULER: yes, we have to measure. Sorry.
ROLLER: For this I really do recommend a rolling machine, but a rolling pin will work--just sandwich your clay between sheets of wax paper first
Cut them into slices, and alternate colors. But don't try to feed them through the machine like that!
Smoosh them a little and taper them at the ends. When you run them through the machine, the edges will start to look crumbly. When that happens, I fold the crumbly edge over towards the middle and run it through again.
For the cover, you'll want to run your clay through at a 3. (Again. Start at 1 and work up slowly!)
Lay out your white page sheet and colored cover sheet. Get out your ruler and your cutting tool.
For your pages, measure 7/8 inch tall by 1 3/4 inch long. Cut that with your cutting tool. You'll want 3 pages per book.
Next cut your cover. It will be 1 1/4 inch tall by 2 inches wide.
Lay out your pages and trim them just a bit so that they are successively smaller.
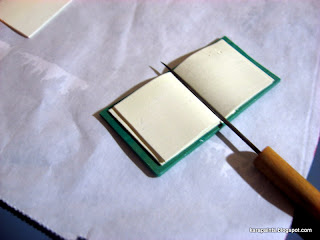
Lay the largest page down first. Center it in the cover and then use your needle tool to crease where the binding would be. you know, the middleish.
Lay down the medium sized page and use your tool again. really smoosh it down.
Take your last page and lay it on your rubber stamp. Press it down just enough to make an indent. Don't get too rough, or it will stick to the stamp!
Lay that page on top and use your needle tool to smoosh the center again. If you don't smoosh it, your pages fall out!
Next, use your needle tool under the top layers to lift the pages a bit. It's a nice touch, don't you think?
Place on a cookie sheet & tent it with foil.
Pop that in your 275 degree oven for 15 minutes.
Let it cool after and then get out your pin backs & TLS.
Squirt a line of TLS onto the back of your book, slightly shorter than the pin back. Place the pin back on top of the line and get some leftover clay.
Make your leftover clay into a little ball and place that over the pin back. Smoosh down the edges just a bit.
Flip it over so the pin back is on the back and bake again! Tent it with foil, so your pages don't get burned.
To make a pendant!
Take a 2 1/2 inch length of wire (16 gauge), and fold it into a figure 8.
Flip your project over, add a dot of TLS and lay your wire on top.
Take a ball of leftover clay and smoosh that on top of the wire and TLS.
Tent with foil and bake again!
Wasn't that fun? You could make a whole bunch for members of your book club, the nice librarians at the library--ooh! or you could make slightly larger ones and use them to decorate a Christmas tree, or make a wreath for your front door...
I'm going to go make some more right now!


3 comments:
Kara, that's adorable! :) Book love!
It's a very nice hobby!!! You have "golden" hands!
Very cool. Love your ideas and your examples
Post a Comment